One of the most exciting additions in macOS Tahoe is Shortcuts automation, which (among many other things) allows Shortcuts to act when things move or change in the filesystem. More than two decades after Folder Actions brought those features to Mac OS X Jaguar, Apple has built a modern take on the feature that’s been popularized by third-party utilities like Hazel.
Unfortunately, Apple’s implementation of this feature is pretty basic—it’s a trigger that fires off a Shortcut and passes it all the information about what’s changed in the filesystem. The job of parsing, filtering, and acting on that information is entirely in the hands of the shortcut itself. This means that to take advantage of this feature, users will need a grasp of some Shortcuts fundamentals.
That’s what this article is for: to provide a quick guide to building a shortcut that acts on the contents of a folder when items are added to it. In this case, we’ll create a drop folder that moves Markdown files elsewhere when they’re added.
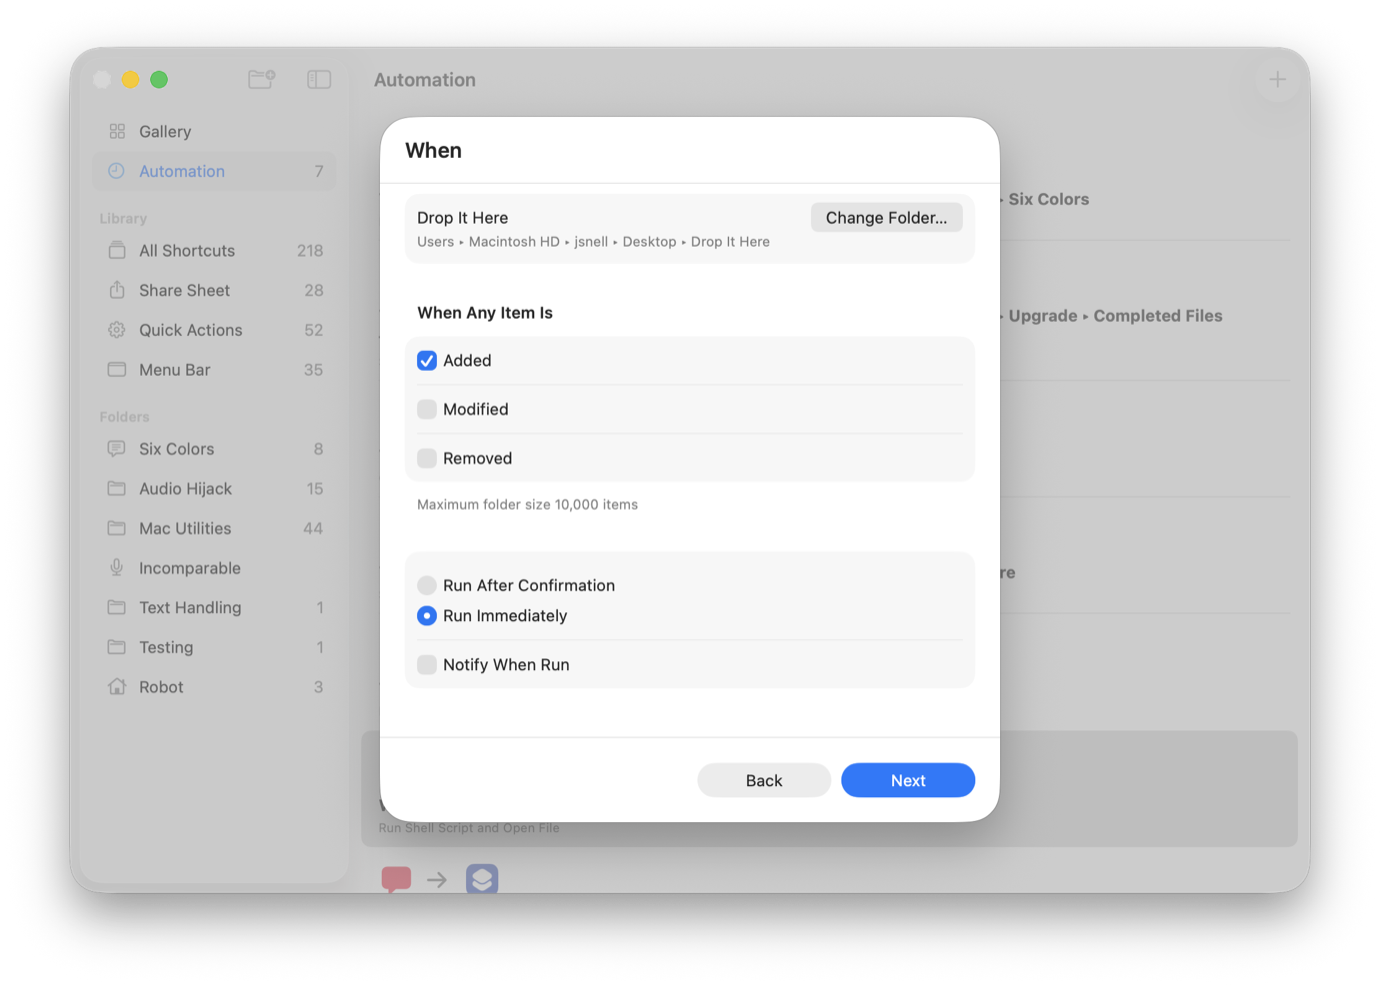
To get started, open Shortcuts and click on the Automation item in the sidebar. Then click the plus button in the top right corner. For this example, we’ll be choosing a Folder automation. In the ensuing dialog box, you’ll pick the folder you want to act on—mine’s called Drop It Here—and then check the box that specifies our shortcut will only run when an item is Added to that folder. I’m also going to click the Run Immediately option and uncheck Notify When Run, because I like my automations to run silently, like a submarine.
When that’s all done, you’re given the option to pick an existing shortcut, but I recommend choosing to make a new one that’s explicitly tied to this action. (It just keeps it tidier. And if you have a routine that you want to call from within the action, you can always use the Run Shortcut block!) With that, a new window will open containing a blank shortcut other than the first step, which is Receive Folder Change Summary As Input. That’s the step where the system will pass a Folder Change Summary item to your shortcut. The rest is up to you!
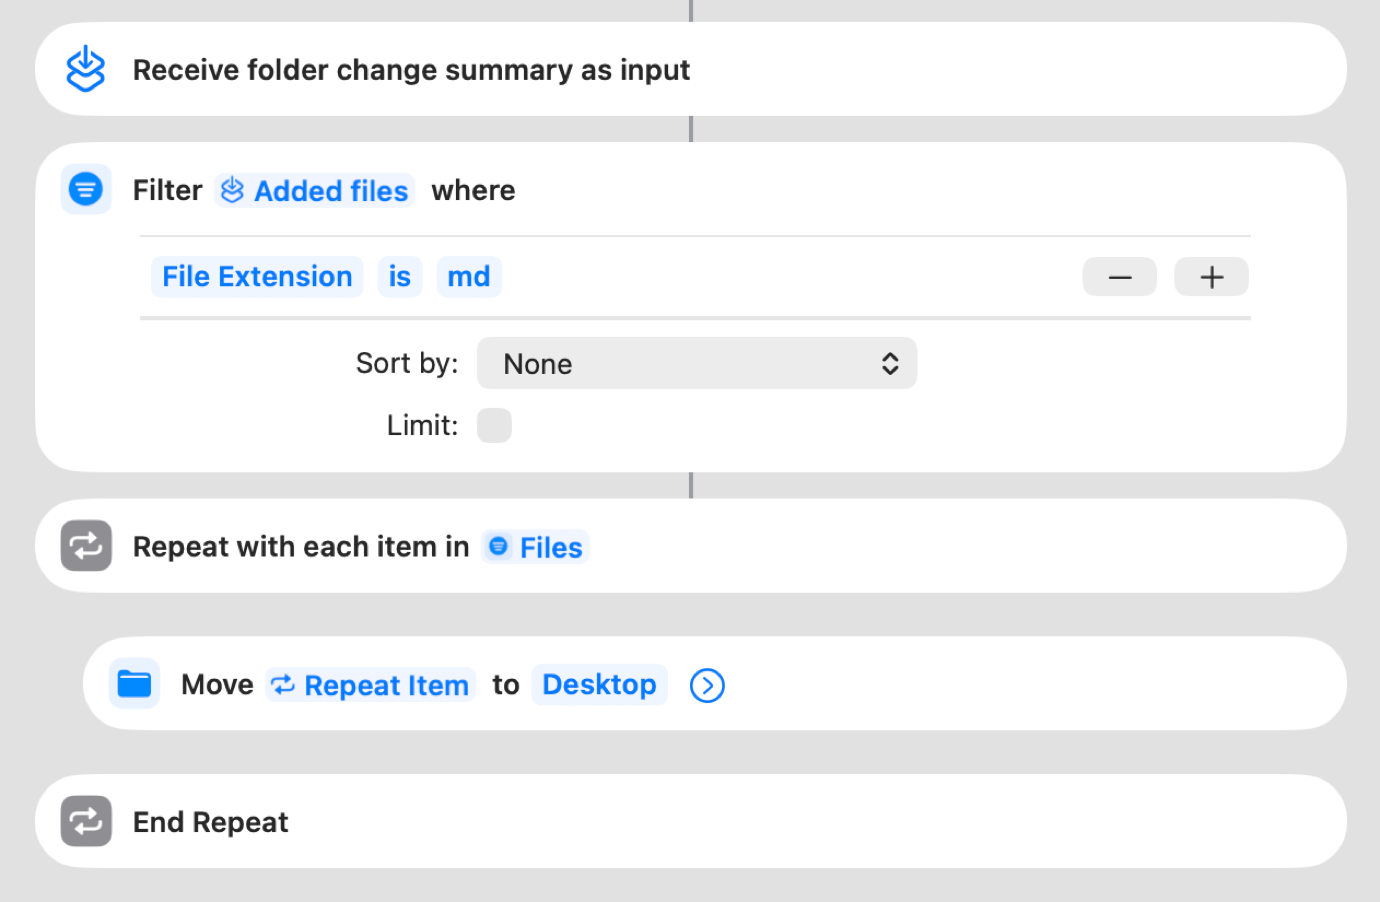
The simplest way to deal with this input is to add a Repeat With Each block, so the shortcut can loop one by one through all the added files and process them individually. Instead of acting on the raw shortcut input, click on the Shortcut Input field that’s automatically filled into the Repeat With Each block and, from the parameters offered by the Folder Change Summary variable, choose Added Files.
If your goal is to take every single item dropped in the folder and then act on it in some way, we’re done. You can delete them or copy them or zip them or move them, all within the repeat loop, and it will happen.
In this example, I want to take it a step further by applying a set of rules so that only certain files are acted upon. This being shortcuts, there are numerous ways to filter the list of added files to include only the ones we want. For very simple sets of rules, the easiest way to do it is probably to use the Filter Files action to act upon the Shortcut Input, and then set the Repeat With Each action to act on the filtered files.
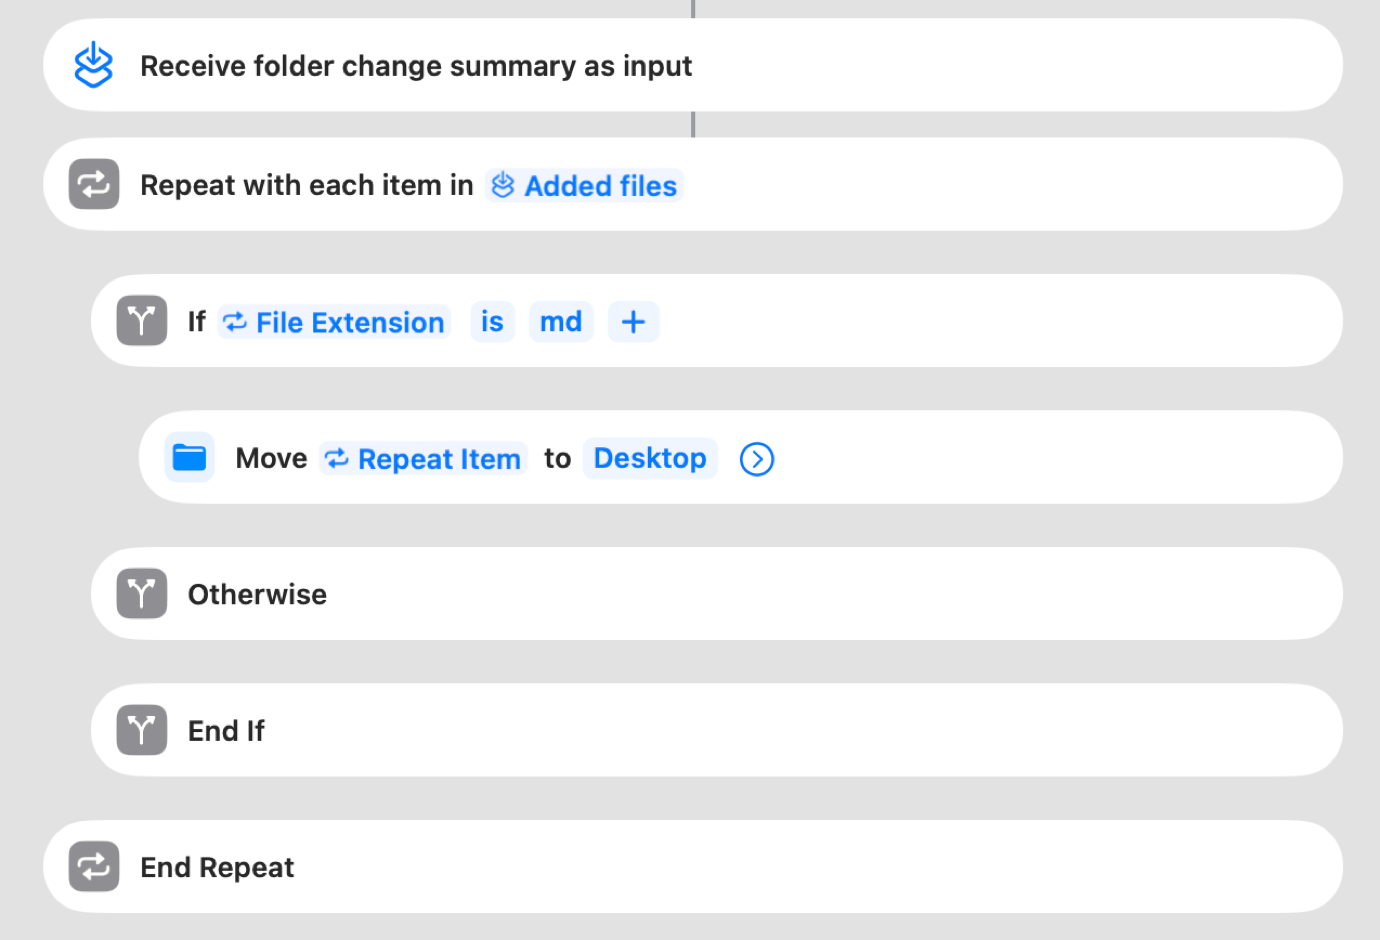
Another approach is to use an If statement within the repeat block, and use that statement to test for the same attributes you’d use in the Filter Files action—in this case, I’m filtering on the File Extension being md for Markdown. Filtering files at the start is probably more efficient, but it doesn’t allow for some complex situations that I’ll address later.
You can also mix and match these approaches, doing basic filtering up front and then performing more specific tests down below. The goal is to, ultimately, have your shortcut only process the right kinds of files, as defined by you.
A complication: subfolders
Now here’s where it gets tricky. Apple’s automation doesn’t offer any choices regarding processing subfolders within your folder—any changes, any level deep in a subfolder hierarchy, will trigger the automation. Dan Moren and I spent some time working on this problem, and while the right solution is for Apple to offer a checkbox so users can decide if these automations should include subfolders, there are a few other ways to approach the situation. (Another alternative would be for Apple to supply the path of the folder the automation is acting on as a variable so that we could test against it.)
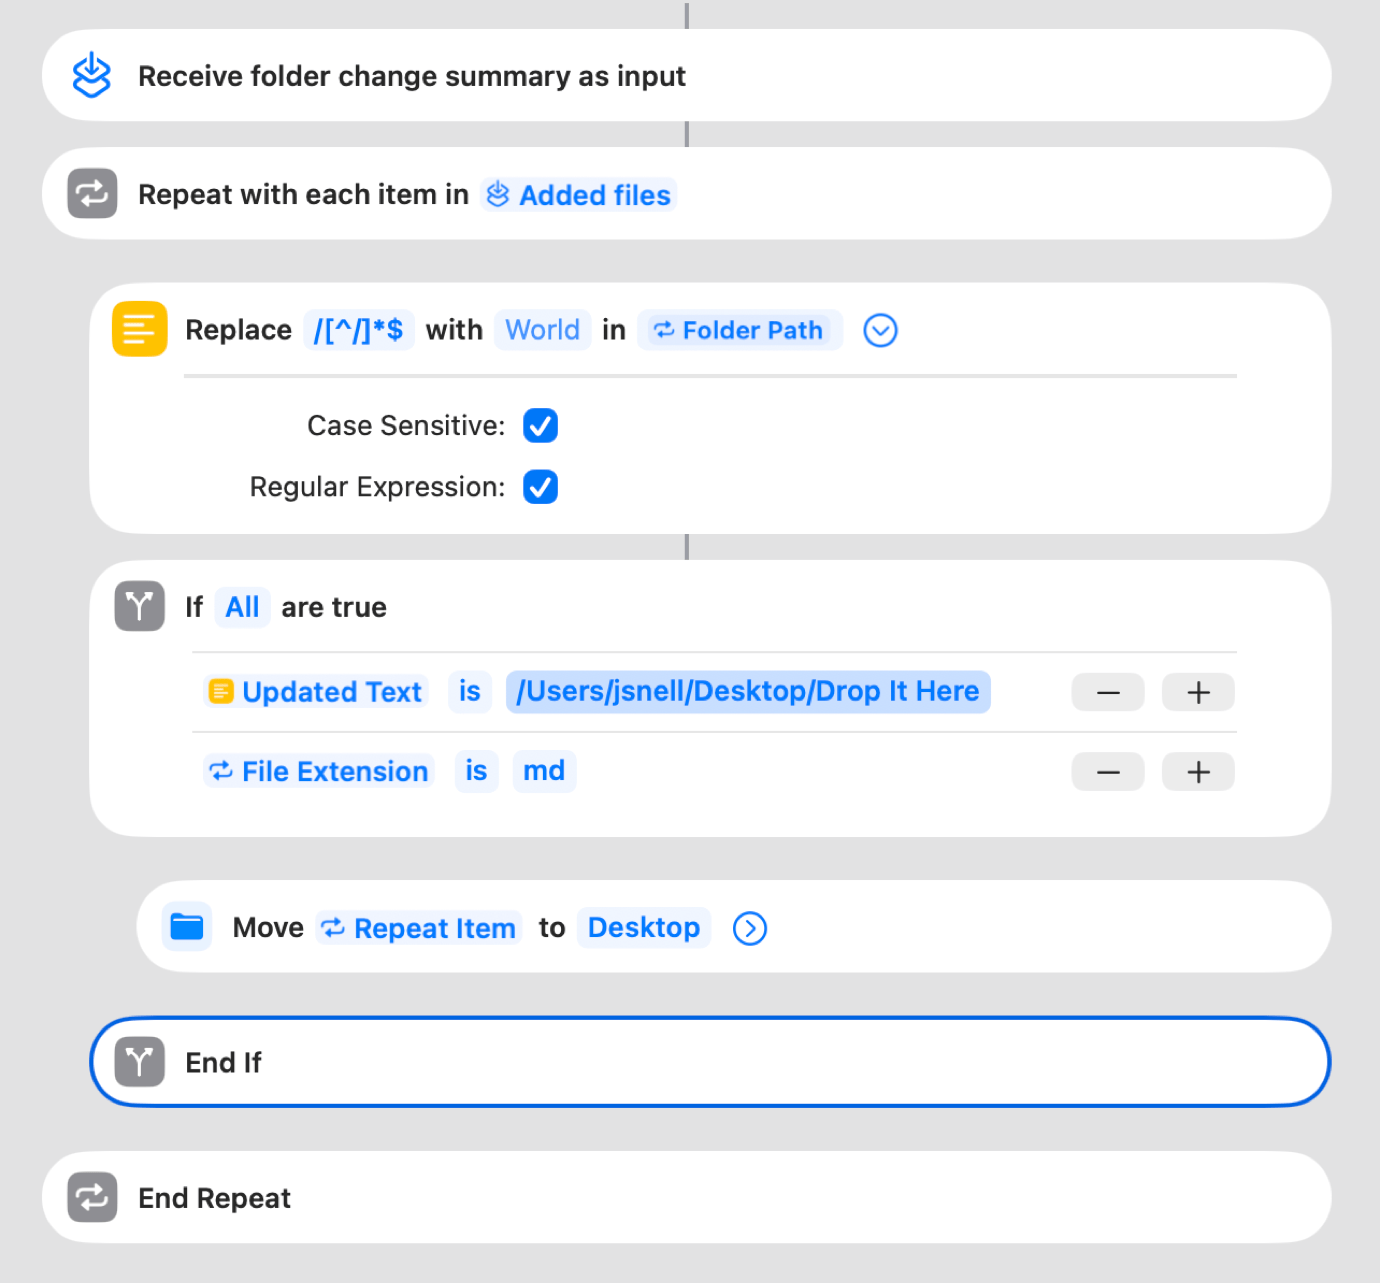
Dan’s approach is to strip the filename off of the incoming path using a regular expression and then strictly filter against the exact path of the top-level folder:
Mine takes more steps but is a bit more Shortcuts-y. I split the path of the incoming file by the slash character, creating a list containing all items in the file’s path. The last item will be the file’s name, but the next-to-last item will be its enclosing folder. (C’mon, Apple, why is enclosing folder not a variable available to me?!) Unfortunately, you can’t tell Shortcuts to get item -2 from a list like you can in Python, so instead I count the items in the list, subtract one from that number, and then get that item:
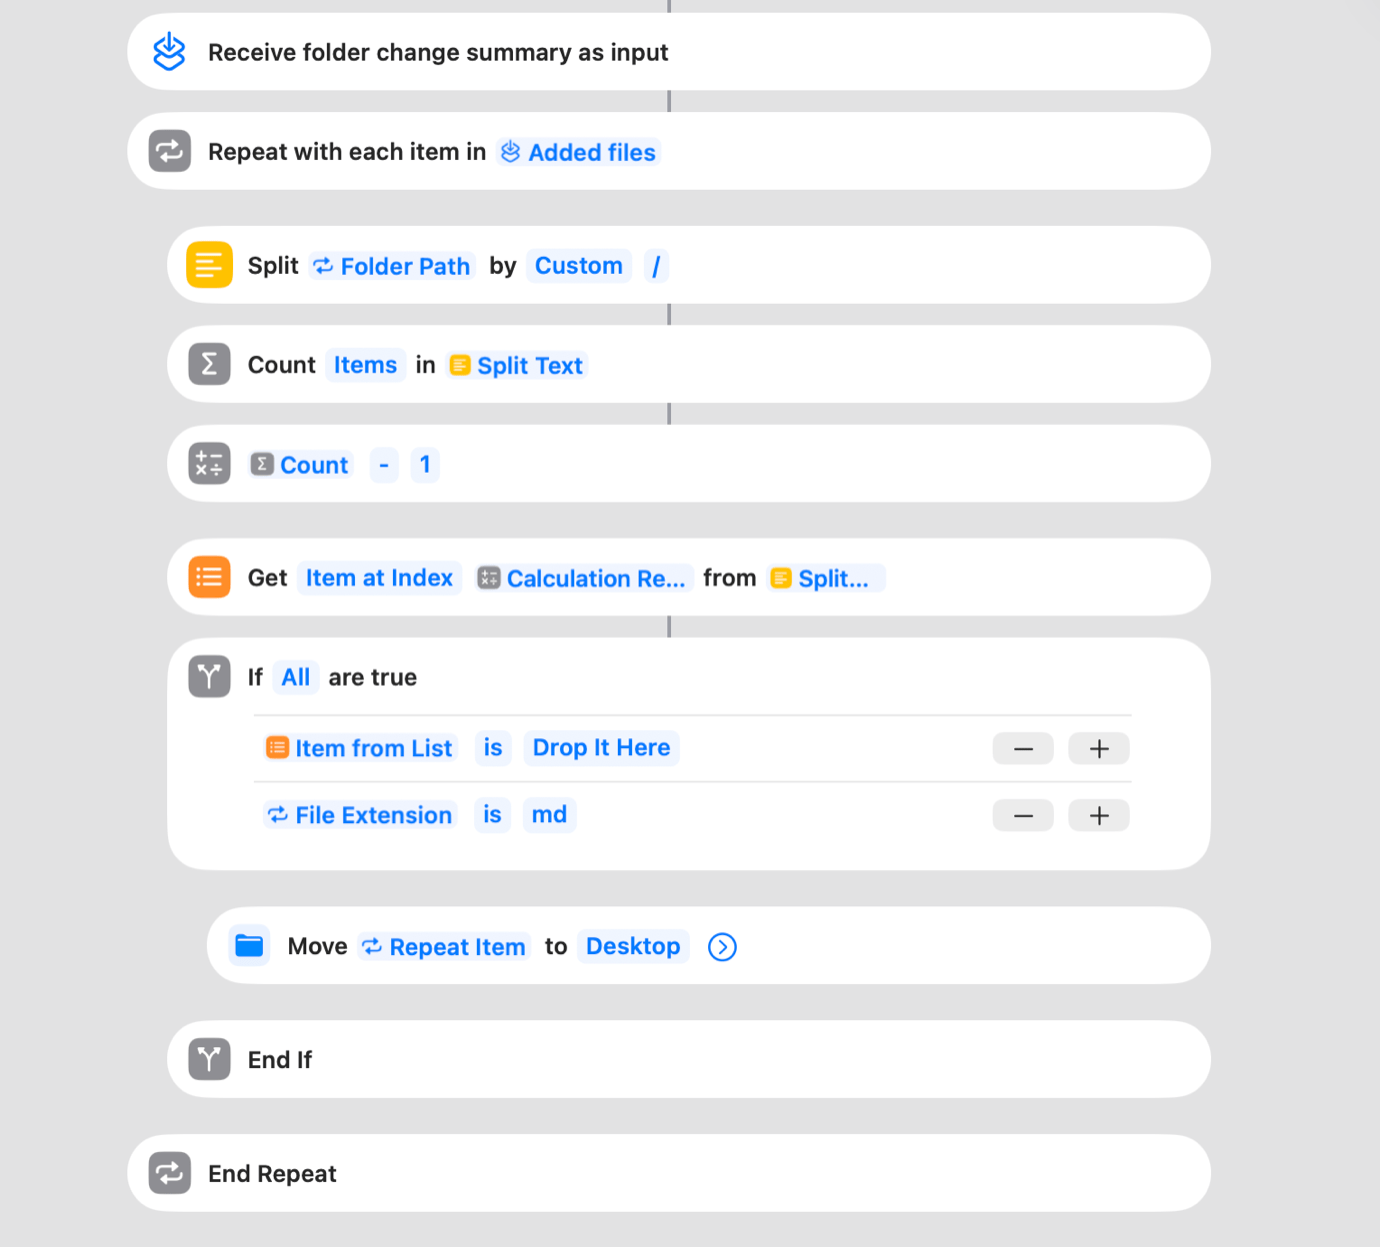
Once that’s all done, I can use the If statement to compare that enclosing folder to the name of the top-level folder I’m filtering, and only proceed if the file is in the top-level folder.
The bottom line
Automations for Shortcuts in macOS Tahoe really open up a lot of possibilities. I’ve built a half-dozen of them already. Yes, Apple should really make it easier, but once you get the hang of processing the folder change summary, you can really do amazing things. Here are some of the actions I’ve already built:
- Reveal files in the Finder when items are added to my Dropbox
- Copy files to my Desktop when the Upgrade MP3 files are added to Dropbox by our editor, Jim Metzendorf
- Convert certain image files to JPEG when they’re dropped on my Desktop or added to my Downloads folder
- Delete that Zoom installer that Zoom keeps downloading at the moment when I click on a web link before it launches Zoom
- Convert Southwest Airlines ics files into a proper format via a Python script before adding them to my calendar
Once you get used to building filters and using Repeat With Each Item blocks, this is a feature that can save you a whole lot of drudgery. And isn’t that exactly what user automation is supposed to do?
If you appreciate articles like this one, support us by becoming a Six Colors subscriber. Subscribers get access to an exclusive podcast, members-only stories, and a special community.