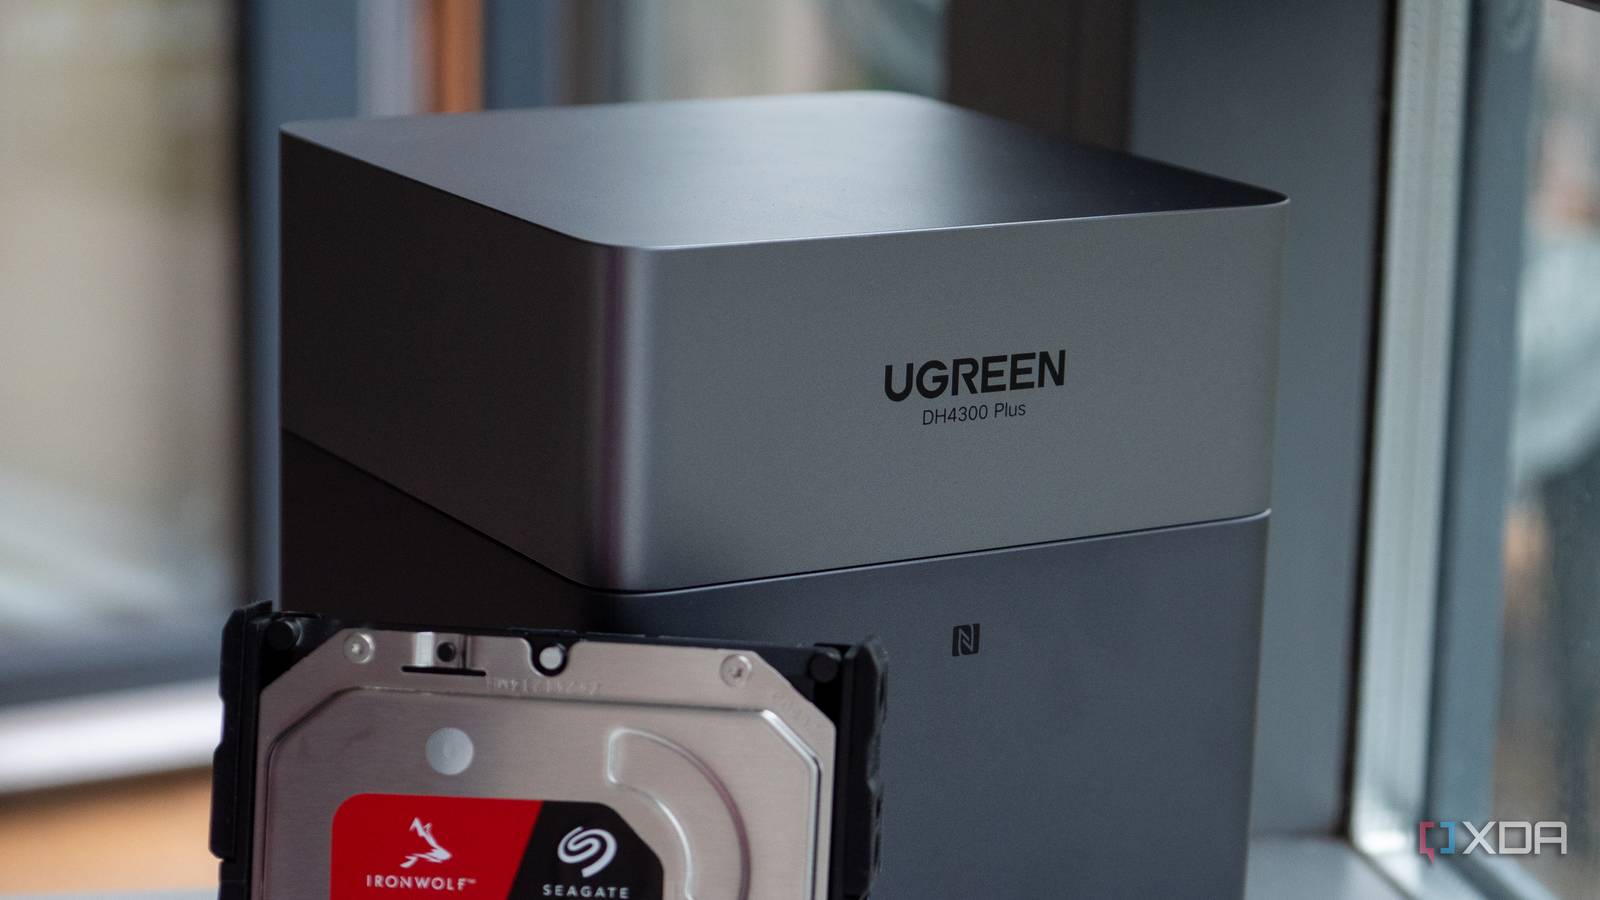
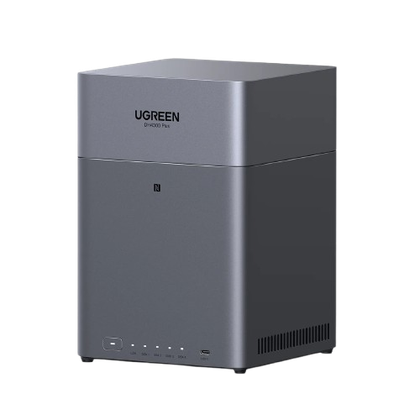
NAS devices come in all kinds of shapes and sizes, from the basic two-bay NAS to the more extravagant eight-bay options. With that comes a range of other hardware too, like the CPU, RAM, and flash storage. Recently, Ugreen launched the DH4300 Plus outside of China, and it’s a pretty tiny four-bay NAS. Here’s the interesting part, though: it runs on Arm. Specifically, it has a Rockchip RK3588 with 8GB of soldered LPDDR4X RAM, and 32GB of on-board soldered eMMC storage.
Ugreen made a splash in the NAS world with the DXP4800 Plus, a pretty high-end NAS by NAS standards and packing upgradable RAM and NVMe storage. At the time, the company also launched a number of other NAS devices aimed at differing price points and use cases, but the DH4300 Plus is a budget option which lifts features typically only found in higher-tier NAS models and places them alongside the typical budget offerings you’d expect.
It’s a compact, energy efficient NAS, and I’ve been highly impressed by everything that it offers.
8/10
- CPU
-
Rockchip RK3588
- Memory
-
8 GB LPDDR4X (Soldered)
- Drive Bays
-
Four
Ugreen’s DH4300 Plus NAS is a fantastic four-bay offering with a decent Arm chip inside, 8GB of LPDDR4X soldered RAM, and 32 GB of eMMC soldered flash. It supports up to 120 TB of storage, and the company’s UGOS is packed with useful features.
- Good value for money
- Very power efficient
- Big UGOS improvements
- Supports practically every transport protocol
- Soldered RAM and flash storage
- CPU is clocked 20% lower than it should be
About this review: I received the Ugreen DH4300 Plus NAS with four 4 TB HDDs from Ugreen for review. The company had no input into the contents of this review.
Ugreen’s hardware and design choices are interesting (in a good way)
Aside from some CPU weirdness
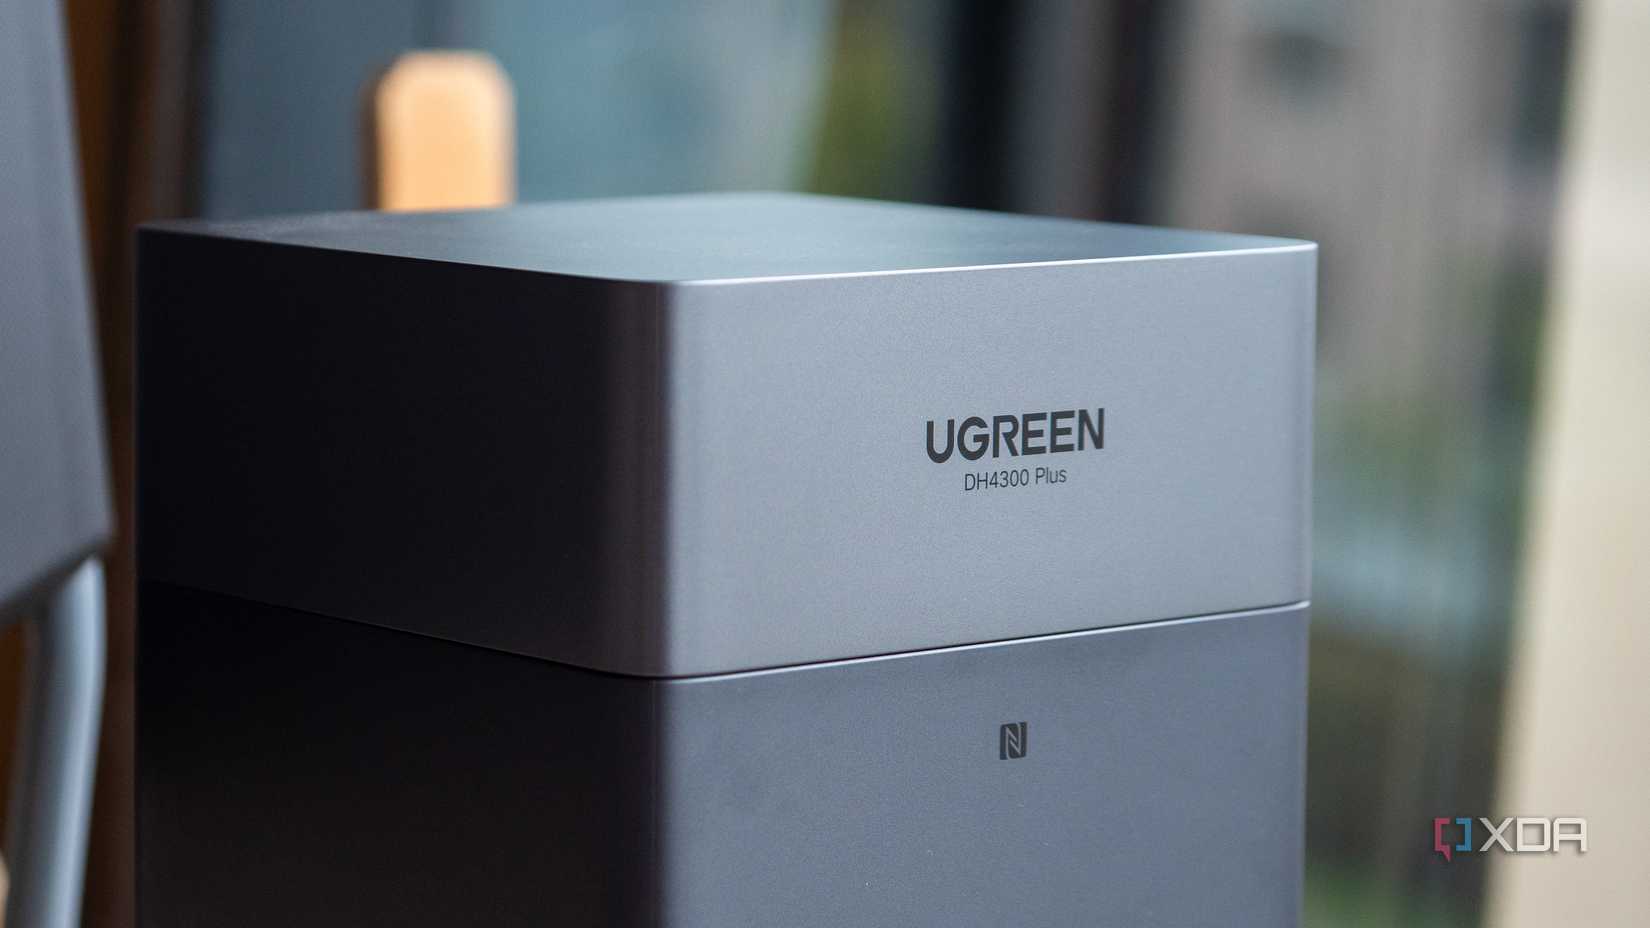
Ugreen’s DH4300 Plus is quite similar to the last DXP4800 Plus in terms of design language, while cutting costs where necessary to bring down its price point. For starters, while it retains the same gray design, it’s a plastic vertical chassis instead of an aluminum horizontal one. It’s a lot more compact, too, and the lid is magnetized to the rest of the body. It’s quite light to carry around, though less so when you’ve got four hard drives inside it.
The front has five LEDs; a LAN indicator alongside an LED for each HDD installed to signify drive activity. The only front-facing I/O is a lone USB-C port, but flipping around to the back reveals the rest of its connectivity. Here you’ll find two USB 3.2 Gen 1 Type-A ports, a 2.5 GbE LAN port, and an HDMI output port. The HDMI output, as is the case with the DXP4800 Plus as well, is reserved for direct playback and can’t be used to control the device with a mouse and keyboard.
When it comes to the hardware itself, we’ll start off with one of the few negatives I’ve really found, and that’s the RAM and storage situation. Both are soldered, ànd there are no additional SATA or M.2 ports, nor is there an additional RAM slot to increase memory. You get what you’re sold out of the box (mostly, we’ll get to that later), and unlike the DXP4800 Plus which has ample slots for both additional flash storage and RAM, you get none of that here.
With that said, this is a “starter” NAS of sorts, supporting up to 120TB of HDD storage and throwing in all of the bells and whistles you’d expect with a few extras. For example, it’s packing a Realtek RTL8125 2.5 GbE Ethernet port, a 5 Gbps USB-C port, two 5 Gbps USB-A ports, and an HDMI 2.1 output port. The 8-core Arm-based CPU packs four Cortex-A76 cores and four Cortex-A55 cores alongside a Mali-G610 GPU and an integrated NPU capable of 6 TOPS at INT8 precision.
Ugreen also took an interesting approach to the drive mount mechanism, and it significantly differs from most other NAS devices that I’ve seen. Rather than using an outward facing bay approach where your HDDs clip into a tray and slide, instead, the top of the NAS is actually just a cover for the drives, and removing it reveals the drives inside, facing upwards in a toaster-like configuration. Installing them isn’t tool-free either, as you’ll need to screw the drives into each bay before reinserting it. Ugreen provides screws and screwdriver here.
When I was conducting my testing, I noticed some interesting details relating to the RK3588 in-use. Rockchip itself advertises the CPU part of the SoC as being a 2.4 GHz CPU, which is reflected in Ugreen’s marketing. However, on further investigation, I discovered that this figure only relates to the performance cores. That’s not too out of the ordinary, but what was out of the ordinary was that the CPU is not even configured for those values on the system.
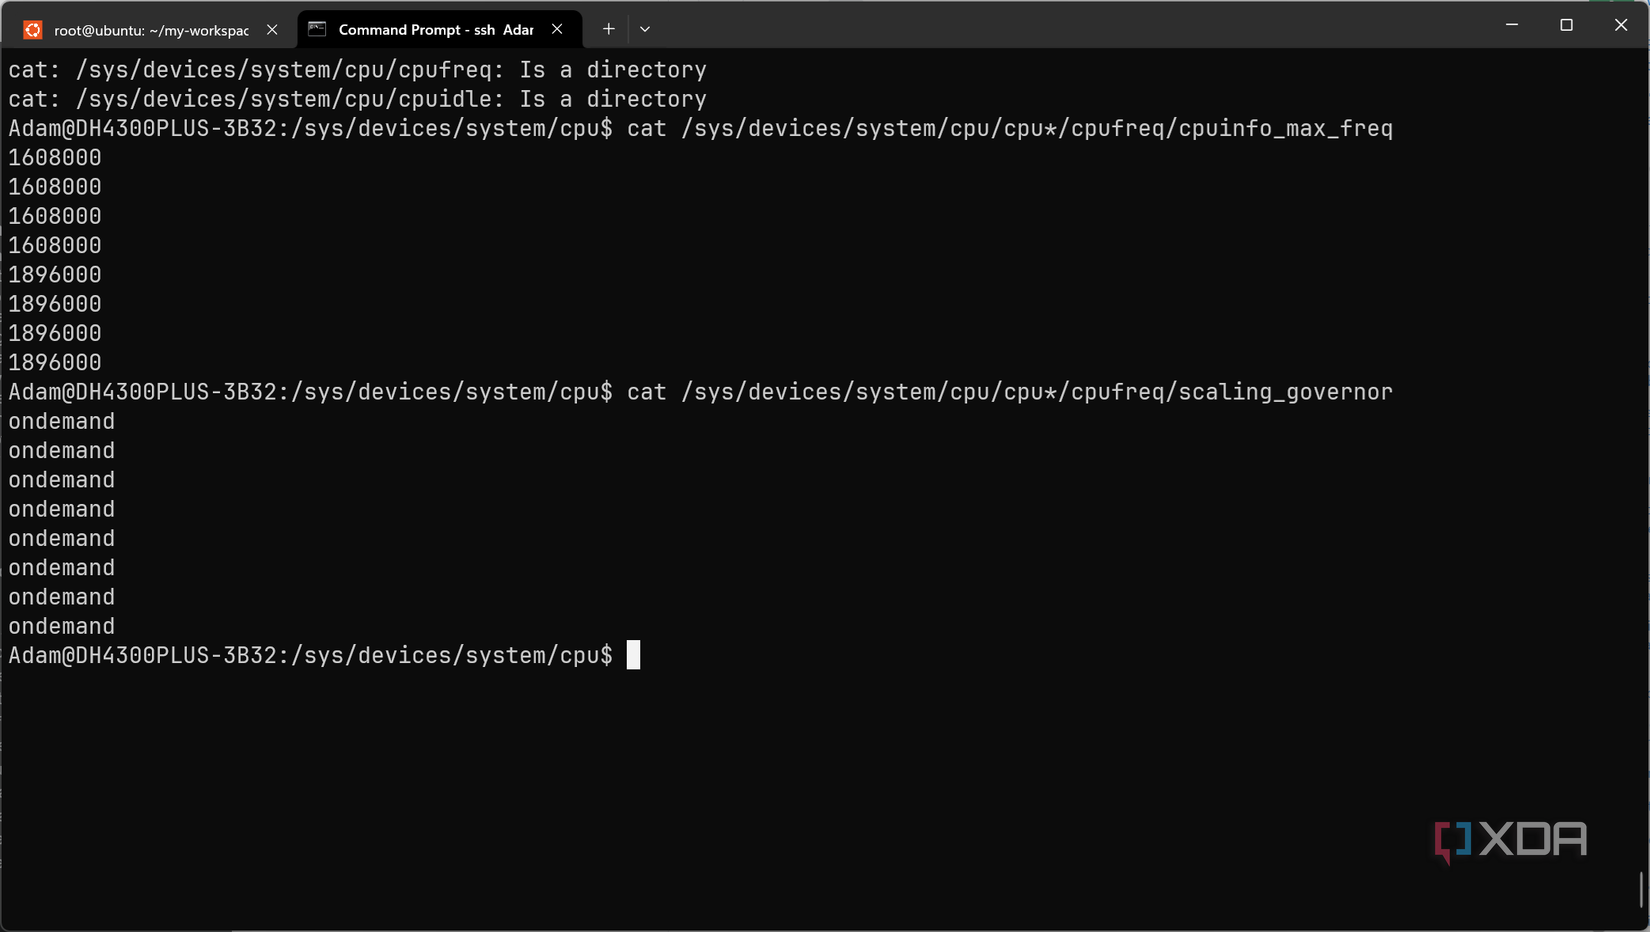
On investigation, the Cortex-A55 cores have a maximum frequency of 1.6 GHz, and the Cortex-A76 cores have a maximum frequency of 1.9 GHz. Below is a table of the actual maximum frequency of each of the cores in both clusters, and the steps available when using the default ondemand governor. I did not see the governor change in normal use.
|
Core type |
Max freq (advertised) |
Max freq (actual) |
Steps available |
|---|---|---|---|
|
Cortex-A55 |
N/A |
1.6 GHz |
|
|
Cortex-A76 |
2.4 GHz |
1.9 GHz |
|
Governors available: interactive, conservative, ondemand (default), userspace, powersave, performance, schedutil.
It’s unclear why Ugreen did this, and I was unable to find any power options in the settings that would suggest that this is a specific mode, such as a “balanced” mode with options for power saving or performance. In the fan settings, I enabled the “full power” fan mode in the hopes that it would change the governor and the frequency scaling alongside it, but it didn’t.
Even forcing the governor to “performance” mode failed to expose higher frequencies as an option. It appears to be a kernel limitation; the compiled kernel only supports these listed frequencies, so there’s no easy way to scale up. I looked into turning the RK3588 DTB (Device Tree Blob) to a DTS (Device Tree Source) and manually adding the frequencies to the opp-table, but that would require recompiling the Linux kernel as there is no “extlinux” to add a Flattened Device Tree entry pointing to the new DTB. On top of that, I’d need to get around signing related problems, and if I got around that problem, if Ugreen has undervolted the SoC, then it could lead to instability and other issues.
Realistically, it’s a rather non-impactful change, but the fact that Ugreen advertises it as a 2.4 GHz CPU and clocks it 20% lower is misleading. For general usage, you almost certainly won’t notice it, but you might when deploying containers for self-hosted applications.
When it comes to the likes of Jellyfin and transcoding media, the RK3588 does better than you’d expect. I verified the existence of the RKMPP interface:
Adam@DH4300PLUS-3B32:~$ ffmpeg -hide_banner -hwaccels
Hardware acceleration methods:
drm
rkmpp
RKMPP on the RK3588 supports H264, HEVC, and AV1. It also supports up to 1080p@480fps or 4k@120fps for transcoding, which is fairly comprehensive and should cover most people’s needs. It’s not an incredibly powerful chip by any means, but it’s exactly what you need for a NAS.
UGOS and using it as a NAS
Big improvements from Ugreen
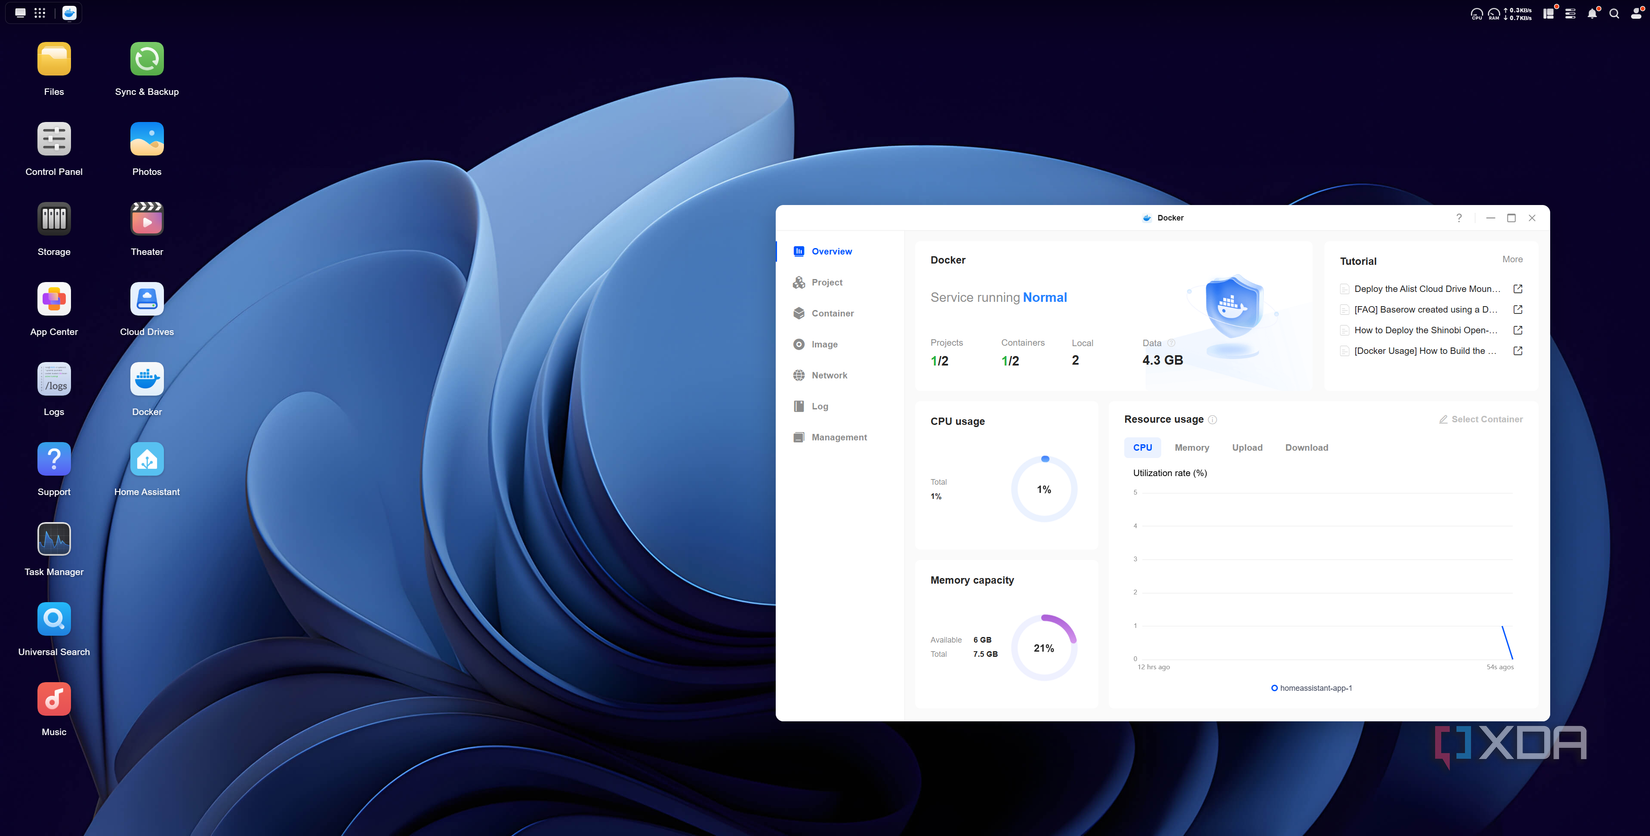
Ugreen OS, the web-based operating system used for Ugreen’s NAS products, has grown significantly since I used it last on the DXP4800 Plus. Back then, I had many qualms with the half-baked software, but this time around it feels like a more polished product. UGOS is a Debian-based distro that uses the apt package manager to manage applications, and you can even enable SSH access for more control if you’d prefer. Ugreen gives you full root access as well, which I greatly appreciate, and while I haven’t tested it on this device yet, the DXP4800 Plus was astonishingly easy to install Proxmox on and replace UGOS.
Thankfully, even Docker support works out of the box, though it’s hampered by the 8 GB RAM limitation. If you want to run native UGOS applications, though, these are packaged as UPK files, and these come with HTML files for rendering the application’s UI elements in the browser. Applications have to be built specifically for this, meaning that software developers will need to build programs specifically for Ugreen’s operating system if they want them to surface in the web-based desktop. Docker abstracts this significantly and allows you to host anythng you want, but at the cost of not being able to use individual applications through the UI.
In the built-in app center, three apps are explicitly installed as Docker containers. These are Home Assistant, Jellyfin, and Firefox. What’s interesting about the Home Assistant container is that it uses a “ugreen/home-assistant:v1” image, which is stuck on Home Assistant 2025.5.3. There’s no way to update the container, meaning that you’ll need to wait for Ugreen to push updates to keep your installation up to date. This version is already several months out of date, so I would recommend installing Home Assistant manually rather than using Ugreen’s image for it.

On the bright side, the Home Assistant container is configured correctly. It has full network access as the container uses the host networking mode, so it can discover devices. mDNS broadcasts don’t typically make their way to Home Assistant’s Container version without additional configuration to allow for host networking, so Ugreen’s attention to detail here is a good thing to see. Still, I’m not a fan of relying on Ugreen’s proprietary out of date image.
Ugreen’s Docker installation is quite interesting here. Despite the existence of the default /var/lib/docker Docker location, all of Docker’s files are in the /volume1/@docker directory, and they’re not symlinked to that default path, either. /volume1 is the mount point for the assembled RAID array, which can use either the BtrFs or ext4 filesystem. I used BtrFs. As a point of note, too, app installation folders are in /volume1/@(app name) where the ‘@’ symbol denotes an installed app.
Overall, Ugreen has improved significantly when it comes to software. UGOS feels a lot more usable as a starter NAS, and even the outdated Home Assistant container is fine given that a user can set it up, use it, and if they like it, take a backup and restore it to an updated container using the official Home Assistant image. Home Assistant officially supports arm64, and Ugreen uses the appropriate image here rather than relying on Docker’s emulation layer. It’s another positive sign that Ugreen’s attention to detail has massively improved.
There are quite a lot of features scattered throughout the operating system that you can configure, and here are just some of the most interesting and important:
- SMB/NFS/FTP/WebDAV/Rsync support
-
Wsdd2 for Windows discovery, mDNS for Time Machine on Macs
- Time Machine works perfectly as well; once I configured it, it was immediately detected on my Mac and could start backing up
- Custom device hostname for accessing on .local
- UGREENlink remote access through Ugreen Cloud (like Synology QuickConnect)
- DDNS support
- Join domain/LDAP
- UPS over USB or SNMP
- Custom HTTPS certificates
When it comes to using this as a NAS, my setup is a little bit… unconventional. The DH4300 Plus is connected to a TP-Link XE75 mesh node, which only has 1 Gbps Ethernet ports. As a result, not only am I technically using this NAS over a wireless connection, but I’m not making use of the full 2.5 Gbps network capabilities, either. With that said, I was greatly impressed by its speed under this configuration.
Using NFS, I created a shared folder in UGOS, then enabled the “NFS client” (I feel like it should be called “NFS server”?) and connected one of my Proxmox nodes to it, in order to use it as a backup location. A 277.3 GB backup transferred in 57 minutes and 45.2 seconds, which is a transfer speed of 81.9 MB/s. Keep in mind that the Proxmox host also has to take the snapshot and compress it before sending, so this figure is lower than what the actual transfer speed would be.
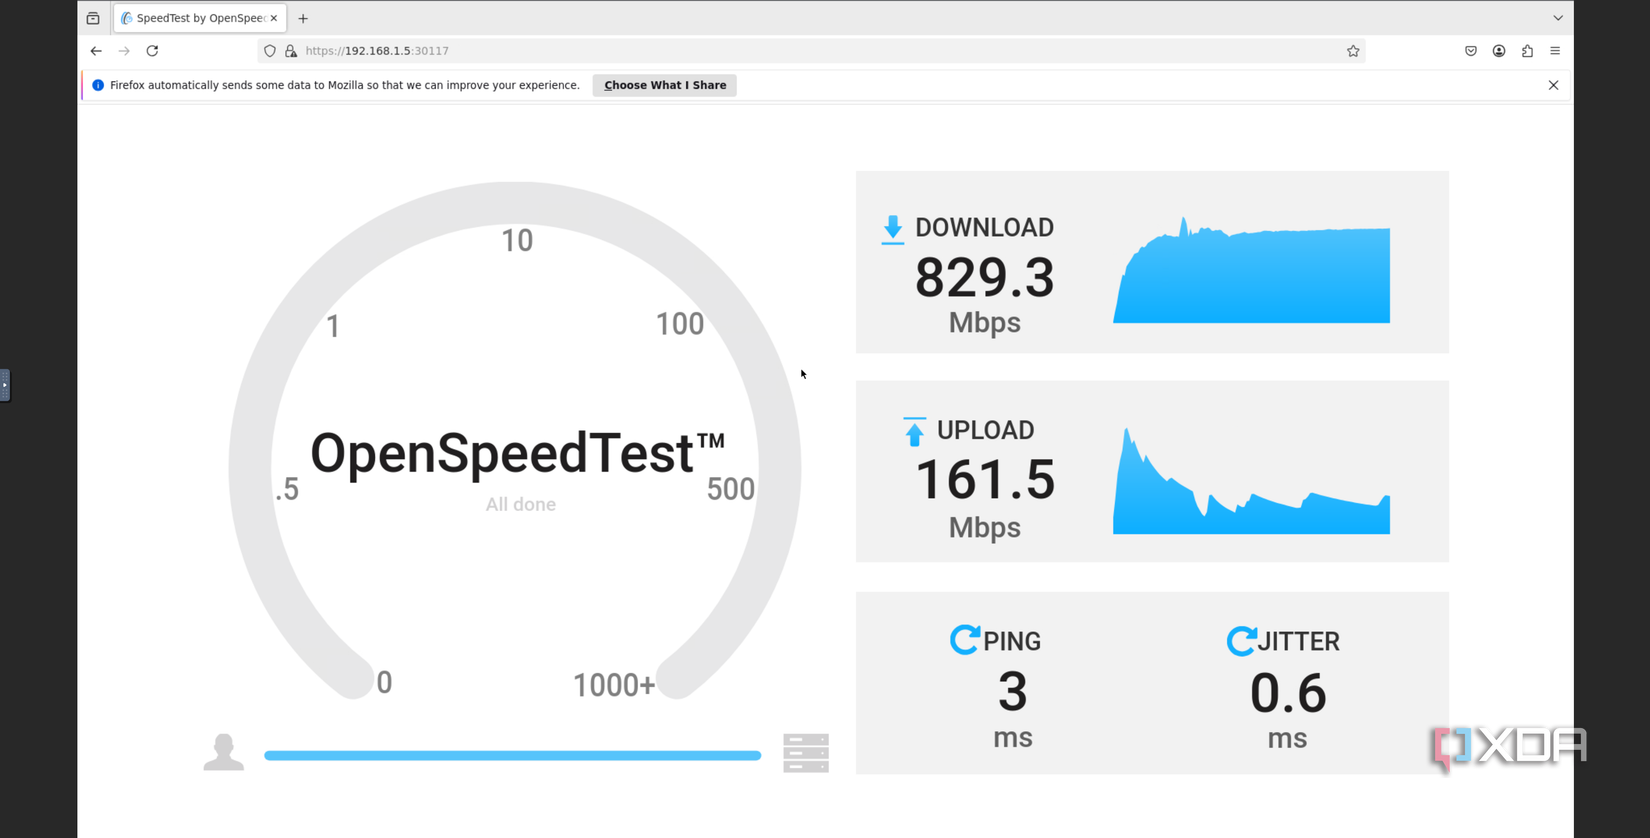
I installed the Firefox application which uses a Docker container and exposes the application over noVNC, and I connected to the Open Speed Test instance hosted on my NAS (connected to a 2.5 GbE switch, which in turn is connected to my mesh network), and I was able to achieve a fairly respectable 829.3 Mbps download. I also achieved a 161.5 Mbps upload. I wouldn’t put too much stock in this figure, as it fluctuated wildly while the noVNC connection in my browser repeatedly disconnected and reconnected. On top of that, Docker’s bridged network adapter might have trouble handling the throughput given the lacklustre CPU for this kind of task.
Just like with Home Assistant. I found that the Firefox image used here is the correct one for the architecture. It packs the aarch64-alpine-linux-musl build of Firefox, and I’ve been very impressed to see the usage of arm64 images used for these applications. Otherwise, Docker’s emulation layer would likely have yielded a substantial performance hit. For those who are curious about actual upload speeds, I was able to achieve a 100 MB/s upload speed from the NAS to my computer, which comes in at 800 Mbps. That’s a far more reasonable result, especially given the less-than-ideal networking conditions the DH4300 Plus is operating in.
Finally, the DH line has a few choice ommissions compared to the DXP line of NAS devices from Ugreen, but they make sense. There are fewer AI features for one, but an even bigger loss is the lack of support for virtual machines. I don’t think anyone would really want to run a virtual machine on this device given the limited RAM, but it’s something to keep in mind.
Ugreen has hit its stride
The DH4300 Plus is fantastic

The Ugreen DH4300 Plus is a fantastic NAS done right. It’s powerful for what you get, offers all of the features you could ever need for networked storage, and throws on a bunch of extras, too. Its MSRP of $430 is on the steep side somewhat, but at the time of writing it’s on sale for $365, and Ugreen often tends to perpetually sell its own products below the MSRP.
For Mac users it has Time Machine support, for Windows users it has SMB, and for Linux users it has NFS. It’s a low-power device that offers a no-frills networked storage experience, which for most people, is absolutely perfect. The actual set up process took less than five minutes once my drives were in place, and even with the dodgy method of connectivity I’m using, I’ve had zero issues.
For those worried about security, I’ve noticed nothing out of the ordinary with the DH4300 Plus, as I monitor my network through OPNsense and Zenarmor. It only does exactly what you expect, and for the price, it’s incredibly competitive. The closest competitor I could find in terms of pricing was the Synology DS923+, which has expandable RAM and storage, two gigabit Ethernet ports for LAGG, and iSCSI support, but it still costs $170 more at MSRP than the Ugreen DH4300 Plus.
If you want a starter NAS for file storage and not much else, then honestly, this is a fantastic buy. It’s power efficient, it’s small, and it has everything you need to sit in a corner and chug away on your network. What’s not to love?
8/10
- CPU
-
Rockchip RK3588
- Memory
-
8 GB LPDDR4X (Soldered)
- Drive Bays
-
Four
Ugreen’s DH4300 Plus NAS is a fantastic four-bay offering with a decent Arm chip inside, 8GB of LPDDR4X soldered RAM, and 32 GB of eMMC soldered flash. It supports up to 120 TB of storage, and the company’s UGOS is packed with useful features.
- Good value for money
- Very power efficient
- Big UGOS improvements
- Supports practically every transport protocol
- Soldered RAM and flash storage
- CPU is clocked 20% lower than it should be