Samsung may now be a major player in the Wear OS smartwatch market, but it once ignored Google’s platform entirely. Early Galaxy Watches ran exclusively on Samsung’s own Tizen OS. After several generations on Wear OS and with Tizen devices aging out, Samsung is officially retiring Tizen starting next month.
Early last year, Samsung laid out its plan to retire Tizen OS, the software that debuted with the first Galaxy Watch back in 2018. The phase-out kicked off on September 30, 2024, when paid watch content vanished from the Galaxy Store, followed by the removal of free downloads on March 31, 2025.
Samsung’s Tizen shutdown wraps up on September 30, 2025. After that date, Galaxy Store downloads for Tizen watches, whether paid or free, will no longer be available (via SamMobile). Anything you’ve already bought will still show up under Galaxy Store → Menu → My Apps, but once you delete it, it’s permanently gone, with no way to re-download it after the cutoff.
Older Galaxy Watch models lose all service support
Samsung is also shutting down all remaining services tied to Tizen OS smartwatches, affecting every model released before the Galaxy Watch 4. That includes the original Galaxy Gear, Gear 2, Gear Live, Gear S lineup, Gear Sport, and the Galaxy Watch series up through the Watch 3. None of these devices will get further updates or support for their connected services.
Of course, your Tizen watch won’t stop working after September 30, 2025, but without store access or service support, it’ll lose a lot of its smartwatch features and feel more limited.
It’s never ideal when a device you still use stops getting support, but keep in mind the last Tizen watch, the Galaxy Watch 3, came out in 2020. If you’re still wearing one, an upgrade is probably overdue.
Samsung’s move looks like a push to get users onto its newer Wear OS lineup, especially with the Galaxy Watch 8 and Galaxy Watch 8 Classic now on store shelves.
Case size
40mm/44mm
Display
1.3-inch/1.5-inch Super AMOLED
Display resolution
438 x 438
CPU
Exynos W1000
The Galaxy Watch 8 is leaning all the way into your well-being, packing in smarter health tools, AI that actually feels helpful, and customization that finally gets out of your way. It’s less of a gadget and more of a genuine sidekick for your daily rhythm.
Case size
46mm
Display
1.34″ Super AMOLED
Display resolution
438 x 438
CPU
Exynos W1000
RAM
2 GB
Storage
64 GB
After sitting one out, Samsung is bringing the physical rotating bezel to its newest watch, giving you a solid, tactile feel for scrolling through alerts and apps. It’s not just nostalgia—this fan favorite teams up with Wear OS and the latest One UI 8 Watch to deliver sharper health tracking and a whole lot of new tricks.
Wine has released version 10.14 of its popular compatibility layer which makes it easy to run Windows applications on Linux. The update includes an upgraded vkd3d library, now at version 1.17, an updated Mono engine at version 10.2.0, IPv6 ping support, Gitlab CI running on Debian Trixie, and a set of bug fixes.
Wine takes its name from the recursive acronym “Wine Is Not an Emulator,” because although it may seem like it emulates Windows, it actually translates Windows system calls directly into Linux ones. This allows many Windows apps, including games and productivity software, to run almost as smoothly on a Linux OS as they would on Microsoft’s own operating system.
SEE ALSO: This updated Windows 11 clone is Linux underneath and makes your old PC run faster — get it now
The bundled vkd3d library upgrade is among the biggest of changes in this new release. vkd3d is the Direct3D to Vulkan translation library that plays a key role in making modern Windows graphics workloads run on Linux.
With the jump to version 1.17, it brings initial High-Level Shading Language support for thread group shared memory, experimental features for the Metal Shading Language target, and a range of bug fixes.
These additions should improve compatibility for apps and games that depend on more advanced graphics functions.
Wine fixes
The 10.14 release also resolves a range of issues, including crashes in VemsTune, ShowStopper, and Roblox Studio, missing or broken graphics in Phantasy Star Online: Blue Burst and Death to Spies, installer failures in Trae and Fritz Chess Coach, as well as fixes for long path handling, gameinput.dll support, and improved stability for multiple Windows games.
Wine 10.14 arrives not long after version 10.13, which was released earlier in the month. That update added a Windows.Gaming.Input configuration tab in the Joystick Control Panel, expanded cryptographic algorithm support with ECDSA_P521 and ECDH_P521 in BCrypt, generated OpenGL WoW64 thunks, and broadened Windows Runtime metadata support in WIDL.
Both updates continue the steady stream of regular refinements that Wine is known.
For Linux users, Wine represents an important bridge. It can make older or Windows-exclusive applications accessible without extra hardware or dual-booting setups. Gamers in particular benefit from the ongoing work on vkd3d, since translation of Direct3D calls into Vulkan often determines how well Windows games perform.
Developers and businesses, on the other hand, often rely on Wine to keep legacy software running smoothly in mixed environments.
Wine 10.14 is available to download now at WineHQ.
What do you think about Wine’s latest update? Let us know in the comments.
On Windows 11, Microsoft makes monthly System updates mandatory to patch security vulnerabilities, improve system performance, and deliver new features. However, it’s not uncommon for updates to also cause unwanted problems.
For instance, when the company made available the August 2025 Security Update (KB5063878), soon after the release, a significant number of users began reporting storage issues on Windows 11 version 24H2. In this particular case, users explained that writing a large amount of data would cause a Solid State Drive (SSD) or Hard Disk Drive (HDD) to disappear.
Restarting the computer might recover the drive, but it could also cause data corruption and data loss. As part of the same Patch Tuesday update, the company had to quickly release an Out-of-band (OOB) update for versions 23H2 and 22H2 to address a critical bug causing problems with the reset and recovery features.
It’s still unclear whether the August 2025 update for version 24H2 is actually causing SSDs or HDDs to fail. Phison recently released a statement explaining that after more than 4,500 cumulative hours of testing the reported drivers, it was unable to reproduce the issue. Microsoft has also been unable (via Bleeping Computer) to replicate the problem and is currently collecting customer feedback to determine if there’s a real fault in the operating system. That said, update-related issues are not uncommon, so it’s always best to stay prepared just in case.
Still, this is not an isolated case. Almost every year, at least one cumulative update causes serious reliability problems for a subset of users. Since it’s unpredictable when a system update will cause problems, and ignoring these patches entirely is not a recommended option, there are some steps you can take for quick recovery and prevent data loss.
It’s important to note that while feature updates are not mandatory as long as the release installed on your computer is not nearing the end of support, systems will eventually download and install the next feature update automatically. In this how-to guide, I’ll outline the different ways you can protect your computer from any updates that may cause problems on Windows 11.
How to protect your PC from buggy updates on Windows 11
These instructions aim to prevent issues and prepare the System for successful recovery on any Windows 11 PC. (Image credit: Daniel Rubino | Windows Central)
1. Enable System Restore
System Restore is a feature that creates snapshots of your computer’s working state and saves them as “restore points.” If the device encounters an issue, you can use a restore point to undo the system changes (including removing a recent update) without affecting your files.
This feature used to come turned on by default, but now, it’s something you have to configure manually.
If you want to have a way to undo changes after installing a buggy update, you must enable System Restore manually and create a restore point before installing a cumulative update.
Turn on System Restore
To enable System Restore on Windows 11, use these steps:
Open Start.
Search for Create a restore point and click the top result to open the System Properties page.
Select the main “System” drive under the “Protection Settings” section.
Click the Configure button.
(Image credit: Mauro Huculak)
Select the “Turn on system protection” option.
(Image credit: Mauro Huculak)
Click the Apply button.
Click the OK button.
Once you complete the steps, the feature will be enabled on your computer.
Although the feature should create restore points automatically upon specific triggers, such as installing a system update or driver, this is not always the case. As a result, it’s recommended to create a restore point manually before making system changes.
Create a restore point
To create a restore point before installing a cumulative update, use these steps:
Open Start.
Search for Create a restore point, and click the top result to open the System Properties page.
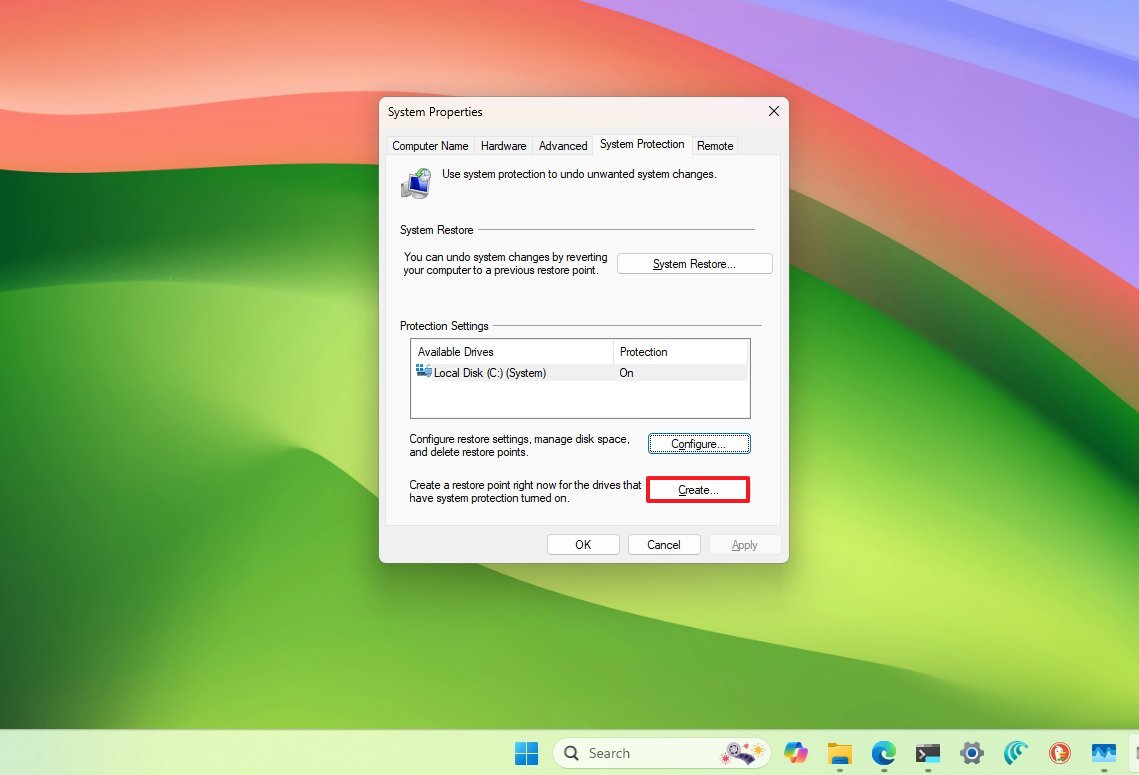
Click the Create button under the “Protection Settings” section.
(Image credit: Mauro Huculak)
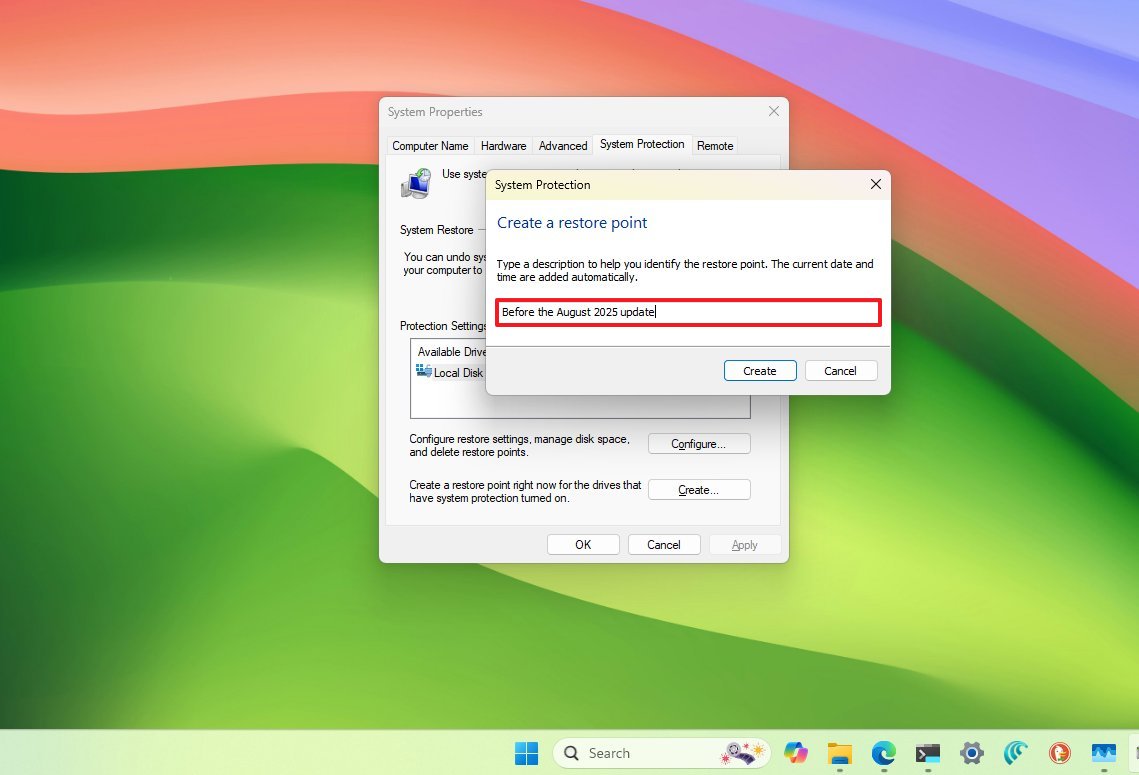
Confirm a descriptive name for the restore point – for example, Before the August 2025 update.
Click the Create button.
(Image credit: Mauro Huculak)
Click the Close button.
Click the OK button.
Click the Close button.
After you complete the steps, you can proceed with the installation of a new update, knowing you can undo the changes if anything happens.
If you must undo the changes, you can check my previous guide to set up and recover a computer using System Restore.
2. Enable Quick Machine Recovery
Quick Machine Recovery (QMR) is relatively new, and it has been designed to restore your computer from a critical boot failure quickly.
In short, when the feature is enabled, and the device can start correctly because of a buggy update or another boot problem, the system will connect to the internet, upload the logs to the cloud, and then it will download the fix (if available) through Windows Update.
The feature has been available since the August 2025 Security Update on version 24H2 and higher releases, and while it comes enabled by default on Windows 11 Home, you have to enable it manually in the “Pro” edition.
To configure the Quick Machine Recovery feature on Windows 11, use these steps:
Open Settings.
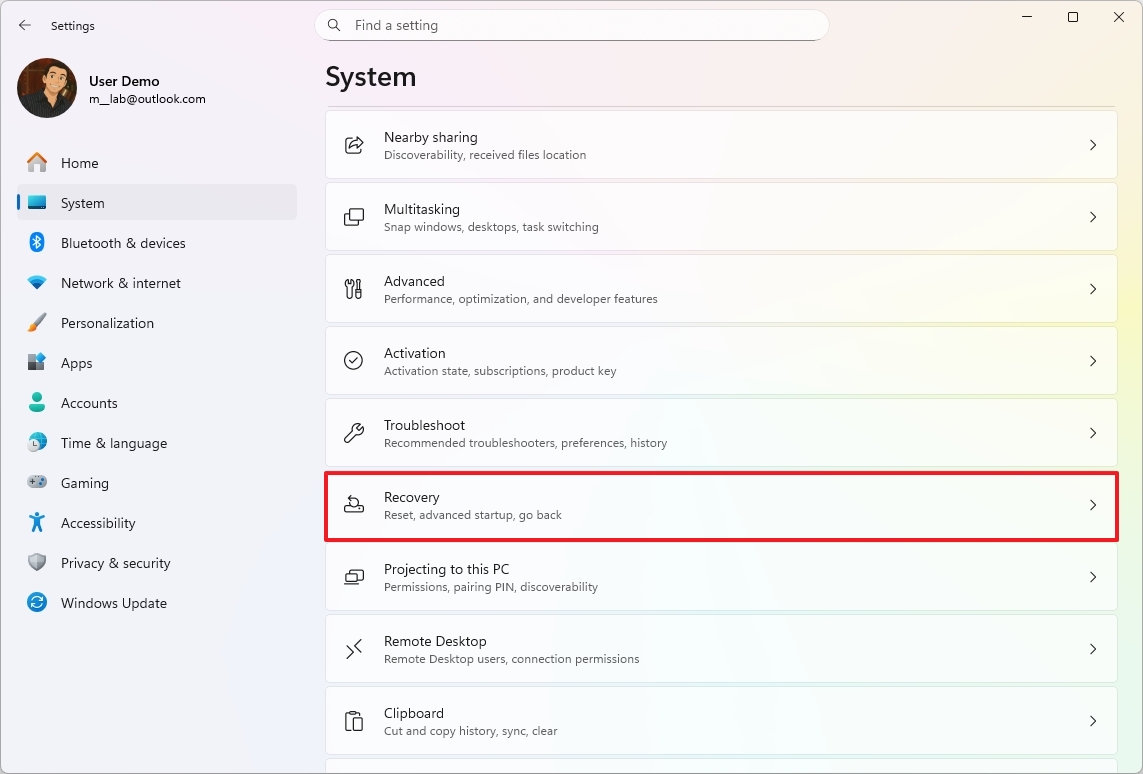
Click on System.
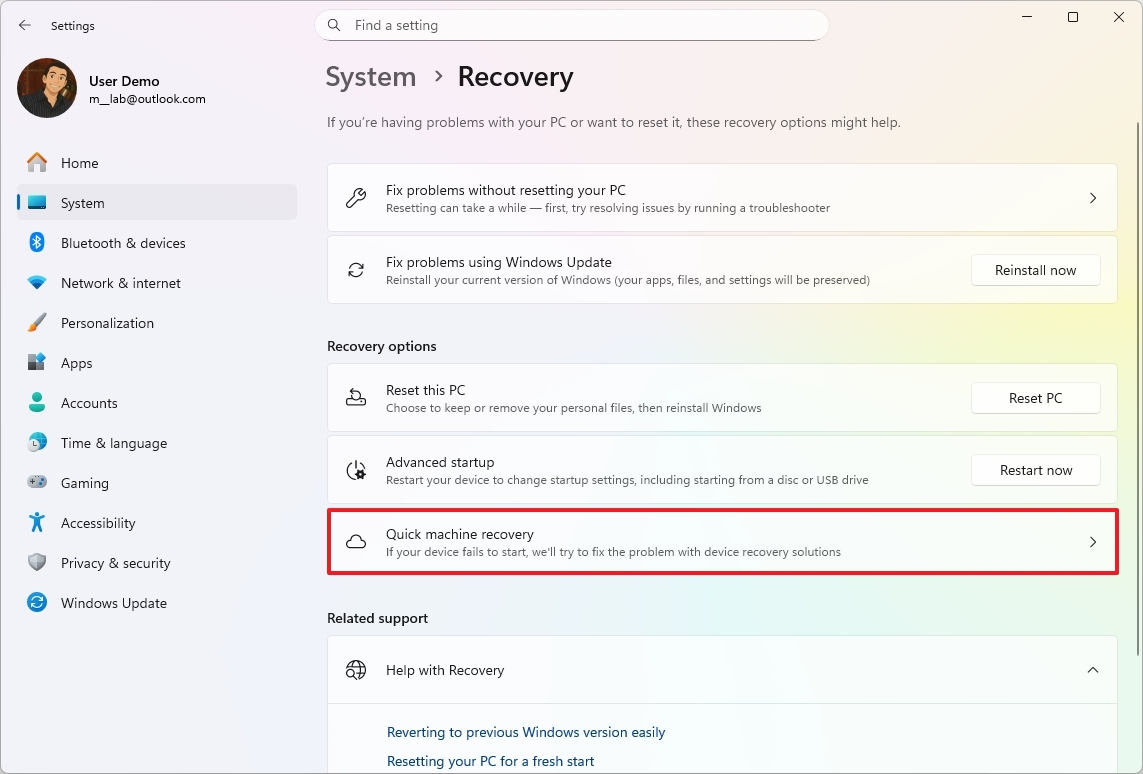
Click the Recovery page on the right side.
(Image credit: Mauro Huculak)
Click the Quick machine recovery setting.
(Image credit: Mauro Huculak)
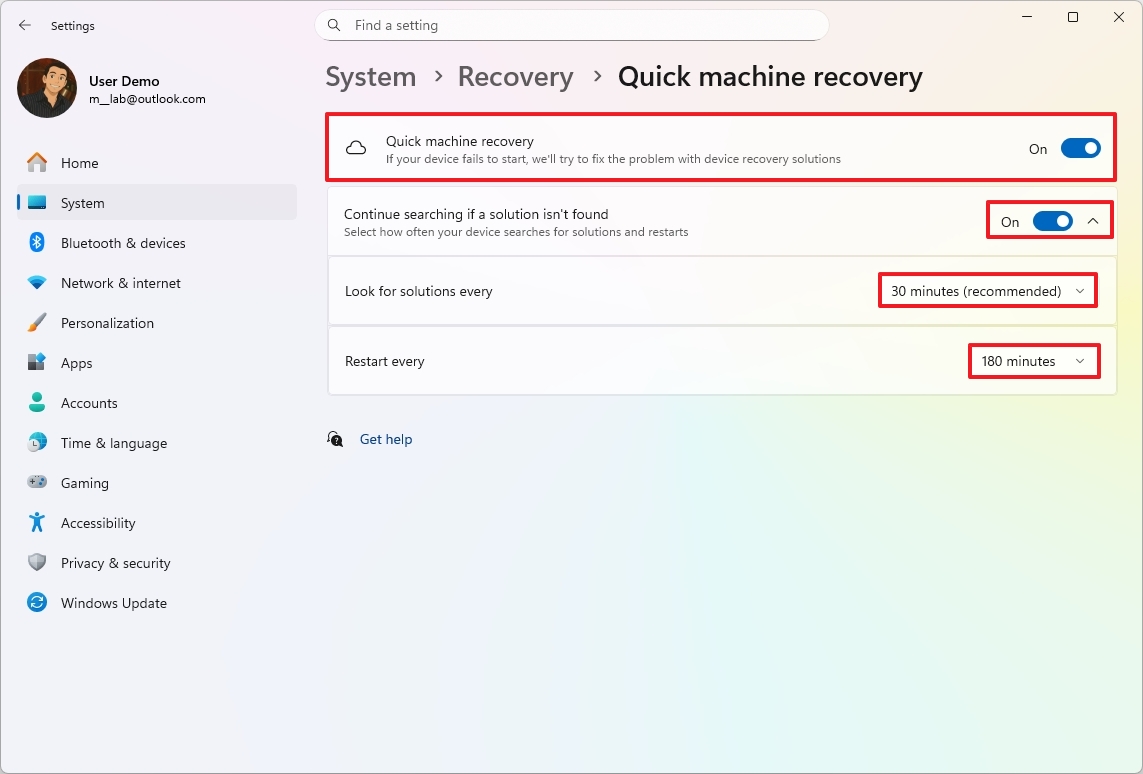
Turn on the “Quick machine recovery” toggle switch to enable the feature.
(Image credit: Mauro Huculak)
Turn on the “Continue search if a solution isn’t found” toggle switch to control the feature behavior.
Choose how long the system has to wait before checking for fixes using the “Look for solutions every” setting.
Select when to restart the device to repeat the process using the “Restart every” setting.
Once you complete the steps, if you receive a buggy update that won’t let the computer boot correctly, the Quick Machine Recovery feature will start automatically to download and apply any available fixes (if applicable).
Microsoft says that this is a “best-effort” feature, meaning that it won’t work on every boot problem.
You can also check my comprehensive guide to set up and use Quick Machine Recovery on Windows 11.
3. Uninstall problematic update
If a cumulative update is known to cause issues, and you still have access to the desktop, consider uninstalling the update until a permanent solution is released.
On Windows 11, you can uninstall a cumulative update from the desktop or recovery environment.
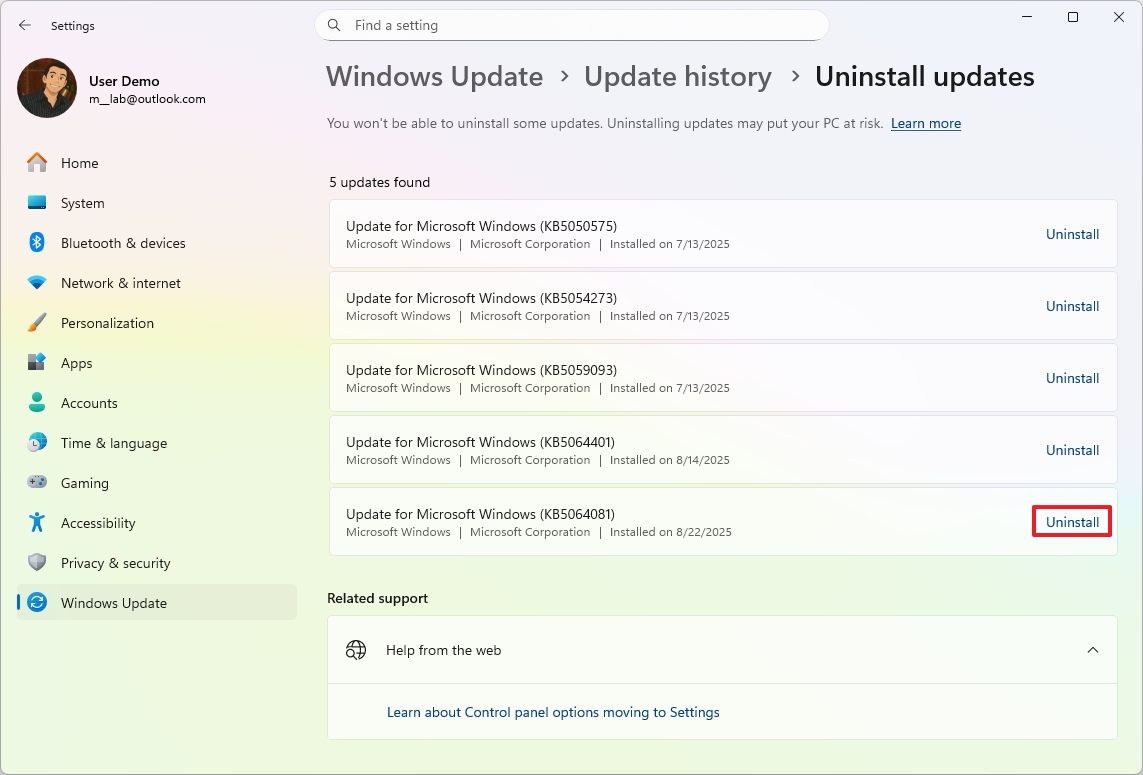
From Settings
If you still have access to the desktop, use these steps:
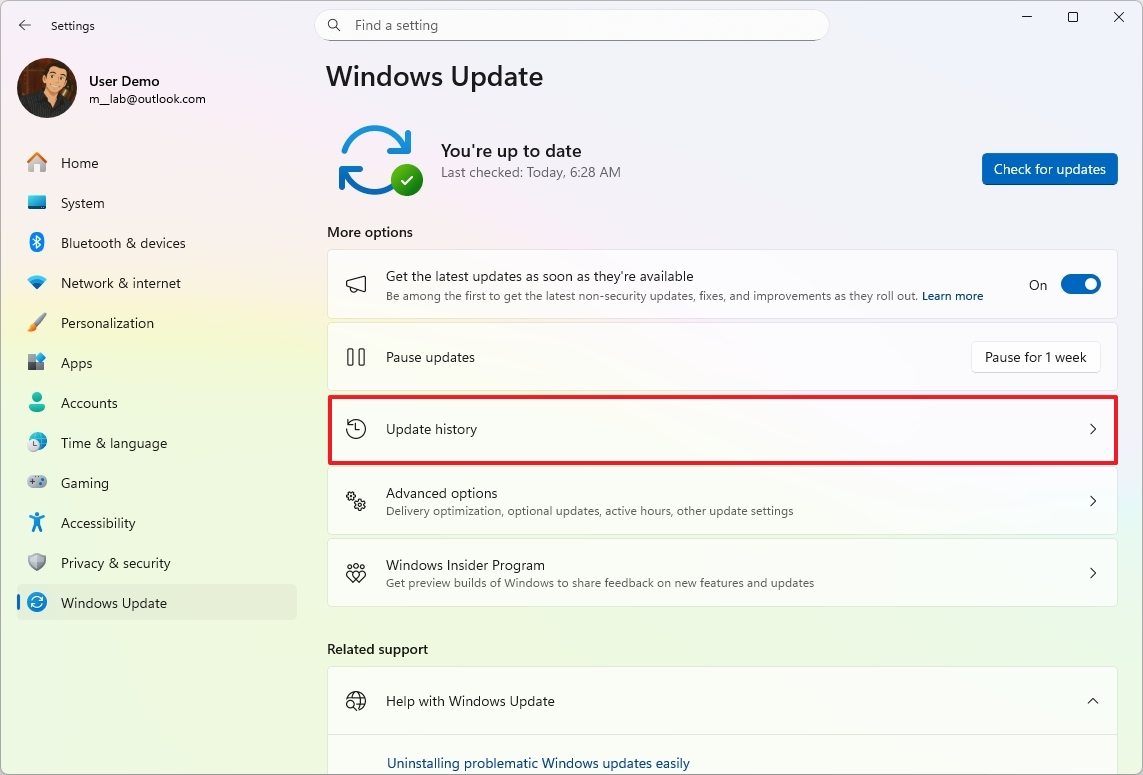
Open Settings.
Click on Windows Update.
Click the Update history page.
(Image credit: Mauro Huculak)
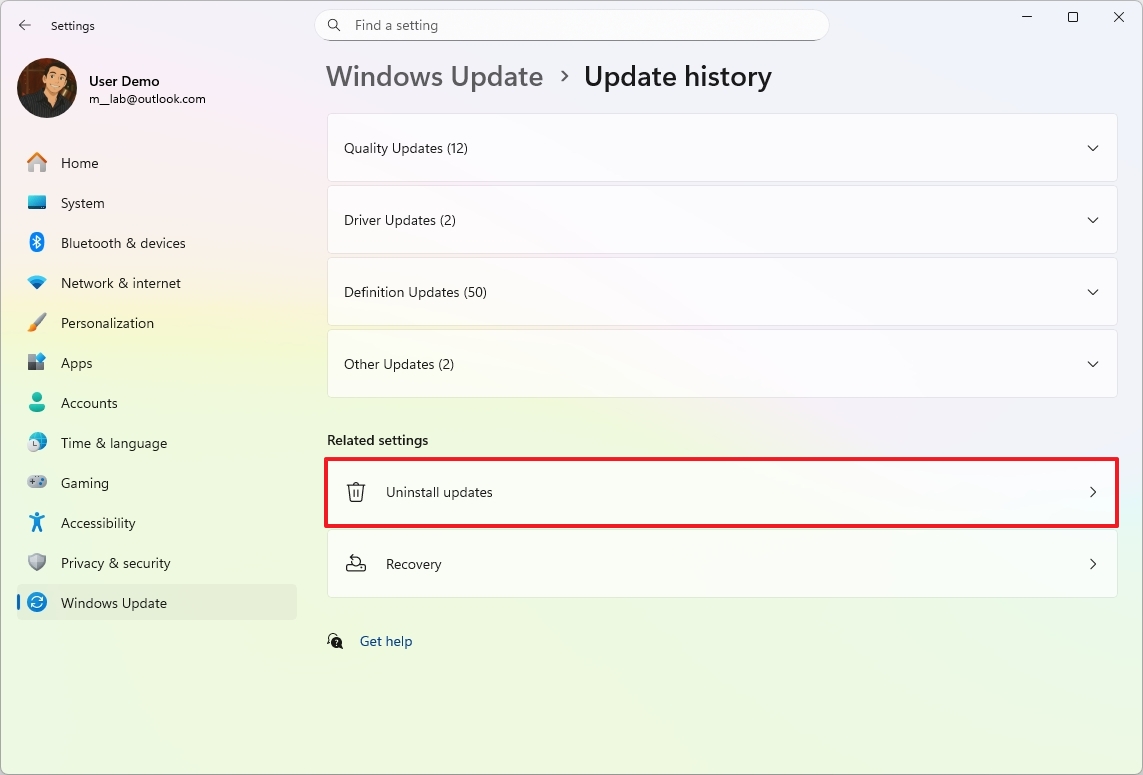
Click the Uninstall updates setting under the “Related settings” section.
(Image credit: Mauro Huculak)
Click the Uninstall option for the buggy update.
(Image credit: Mauro Huculak)
Click the Restart now button (if applicable).
After you complete the steps, open the “Windows Update” page again through the Settings app, and under the “More options” section, click the “Pause for 1 week” button to prevent the system from reinstalling the same update again. If the setting offers more time, choose the longest period, such as four or five weeks.
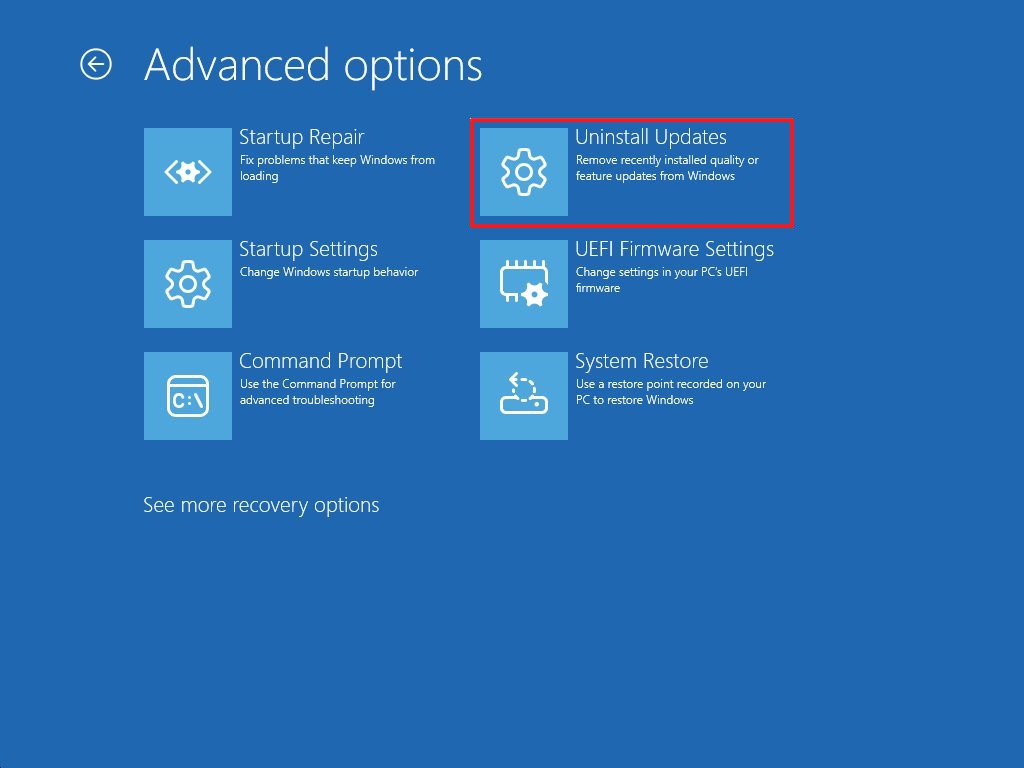
From Windows Recovery Environment (WinRE)
If you don’t have access to a desktop and the Quick Machine Recovery feature didn’t work, you can still uninstall the most recent update with these instructions:
Start PC.
As soon as the Windows logo appears, press and hold the power button to interrupt the boot sequence.
Repeat steps 1 and 2 two more times.
Click the Advanced Startup option.
Click the Troubleshoot option.
Click on Advanced options.
Click the Uninstall Updates option.
(Image credit: Mauro Huculak)
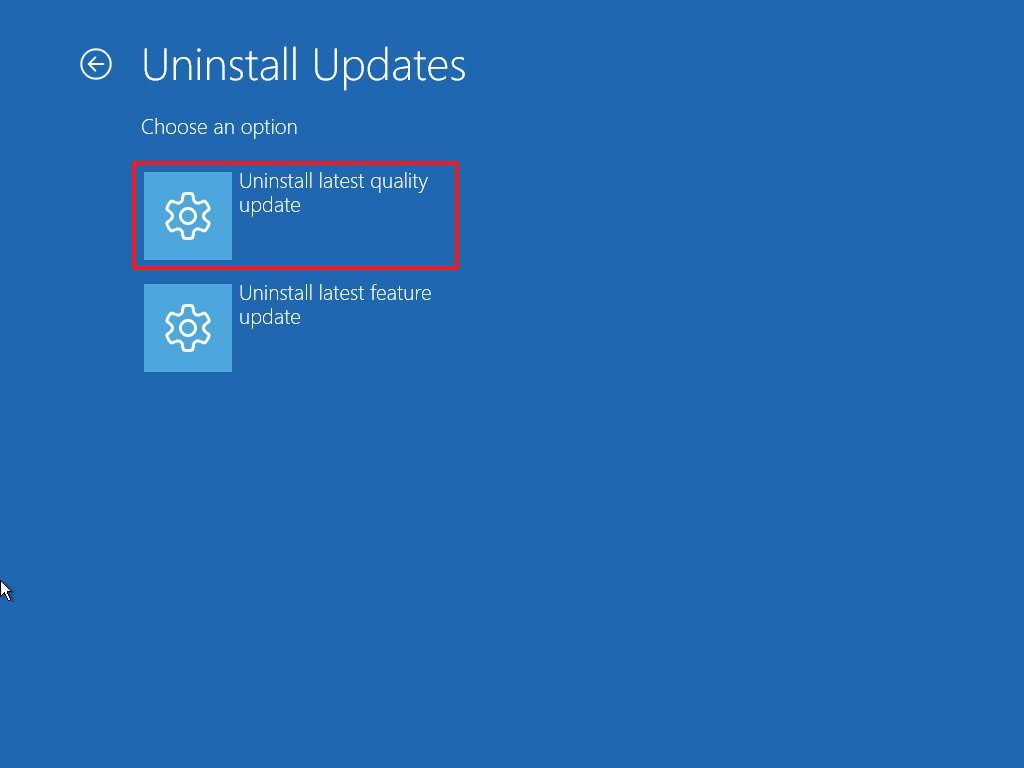
Click the “Uninstall latest quality update” option.
(Image credit: Mauro Huculak)
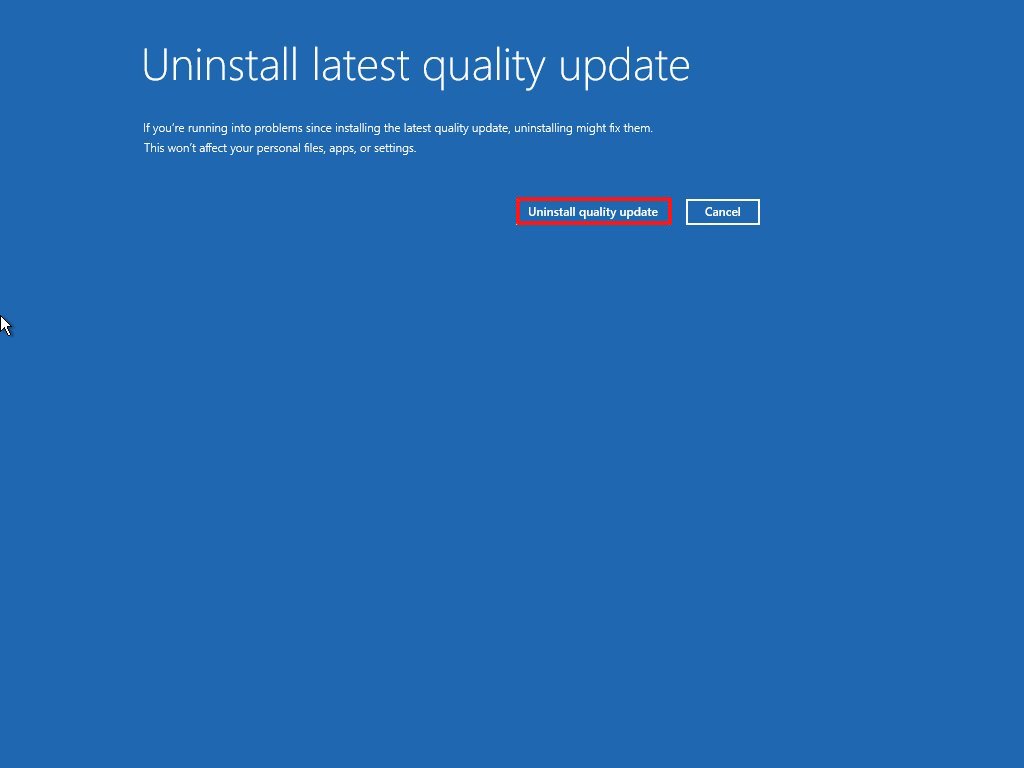
Sign in using your administrator credentials (if applicable).
Click the “Uninstall quality update” button.
(Image credit: Mauro Huculak)
Once you complete the steps, the system will uninstall the most recent update, which in this case, should be the one causing the problem.
4. Disable automatic updates
On Windows 11, you can turn off updates in at least three ways. You can use the pause option within the “Windows Update” settings to temporarily prevent the system from downloading updates. Alternatively, you can permanently turn off the automatic mechanism and opt to trigger the update process manually.
From Settings
To temporarily disable automatic updates, use these steps:
Open Settings.
Click on Windows Update.
Click the “Pause for 1 week” button to turn off automatic updates.
(Image credit: Mauro Huculak)
After you complete the steps, Windows 11 will stop downloading updates automatically for at least one week, which may be enough time for a newer update to address the current issue.
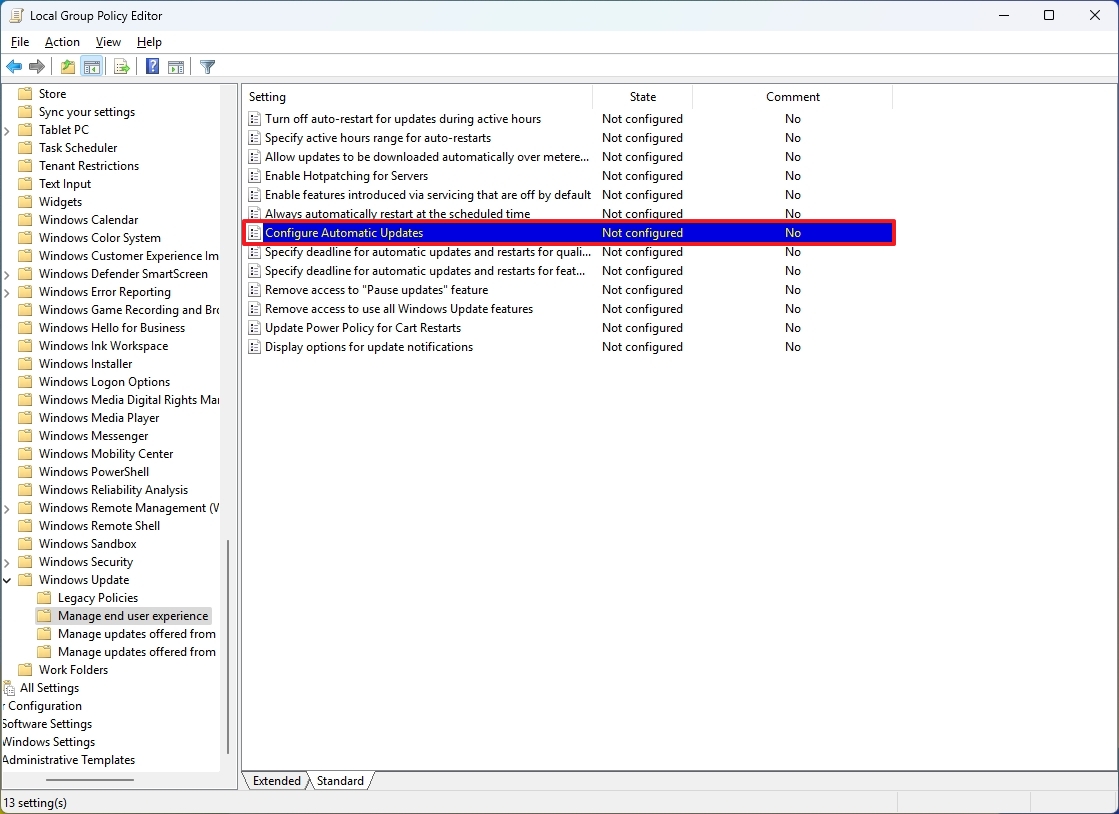
From Group Policy
To turn off automatic Windows 11 updates permanently from Group Policy, use these steps:
Open Start.
Search for gpedit.msc and click the top result to launch the Local Group Policy Editor.
Navigate to the following path: Computer Configuration > Administrative Templates > Windows Components > Windows Update > Manage end user experience
Double-click the “Configure Automatic Updates” policy on the right side.
(Image credit: Mauro Huculak)
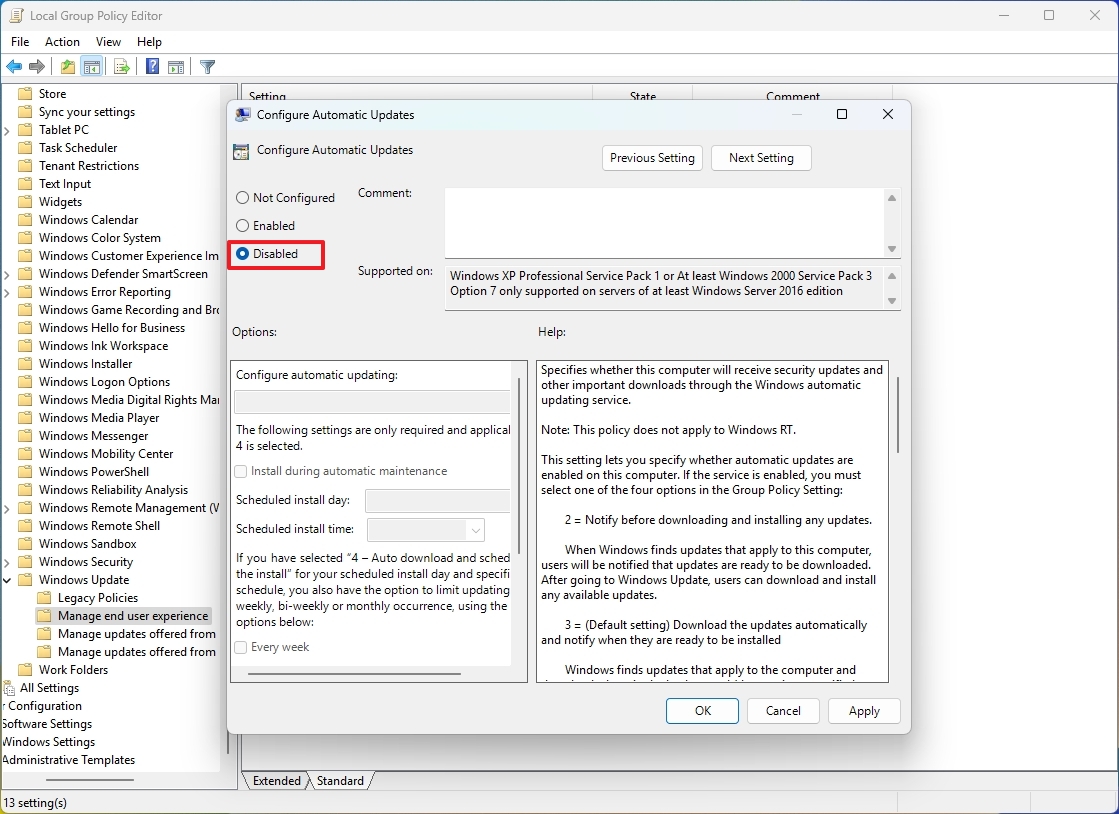
Check the Disabled option to turn off automatic updates permanently on Windows 11.
(Image credit: Mauro Huculak)
Click the Apply button.
Click the OK button.
Once you complete the steps, Windows 11 will stop automatically downloading and installing updates.
At any time, you can update the system manually by opening Settings > Windows Update and clicking the “Check for updates” button.
If you want to re-enable automatic updates, follow the same instructions outlined above, but in step 5, select the “Not Configured” option.
If you want to use the Registry or don’t have access to the Group Policy Editor because you’re using Windows 11 Home, you can refer to my comprehensive guide on how to disable Windows Update on your computer.
5. Create full computer backup
Additionally, another way to protect your setup and data is to create proactive backups of your computer.
Although you should create backups of your device at least once a week, it’s recommended to run a full backup before installing the latest update on your computer.
If you have third-party software, you can use that solution. Otherwise, you can still use the legacy System Image backup tool available on Windows 11 to create a full backup to an external storage:
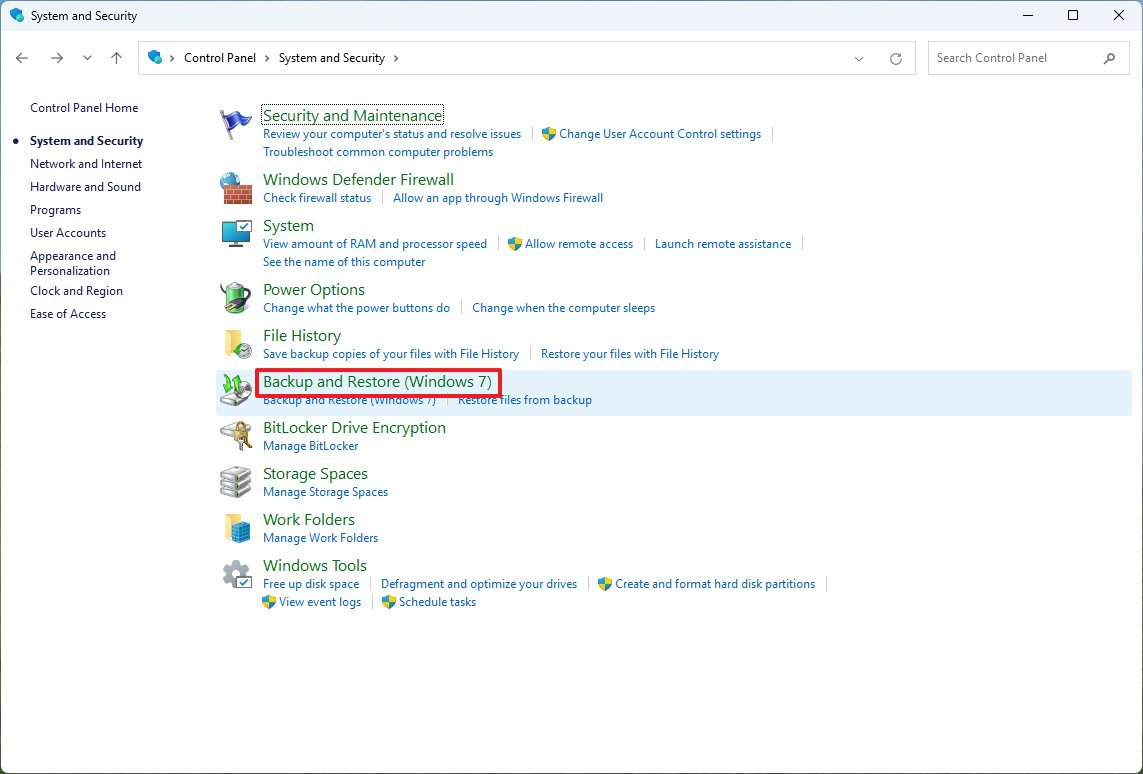
Open Start.
Search for Control Panel and click the top result to open the app.
Click on System and Security.
Click the “Backup and Restore” setting.
(Image credit: Future)
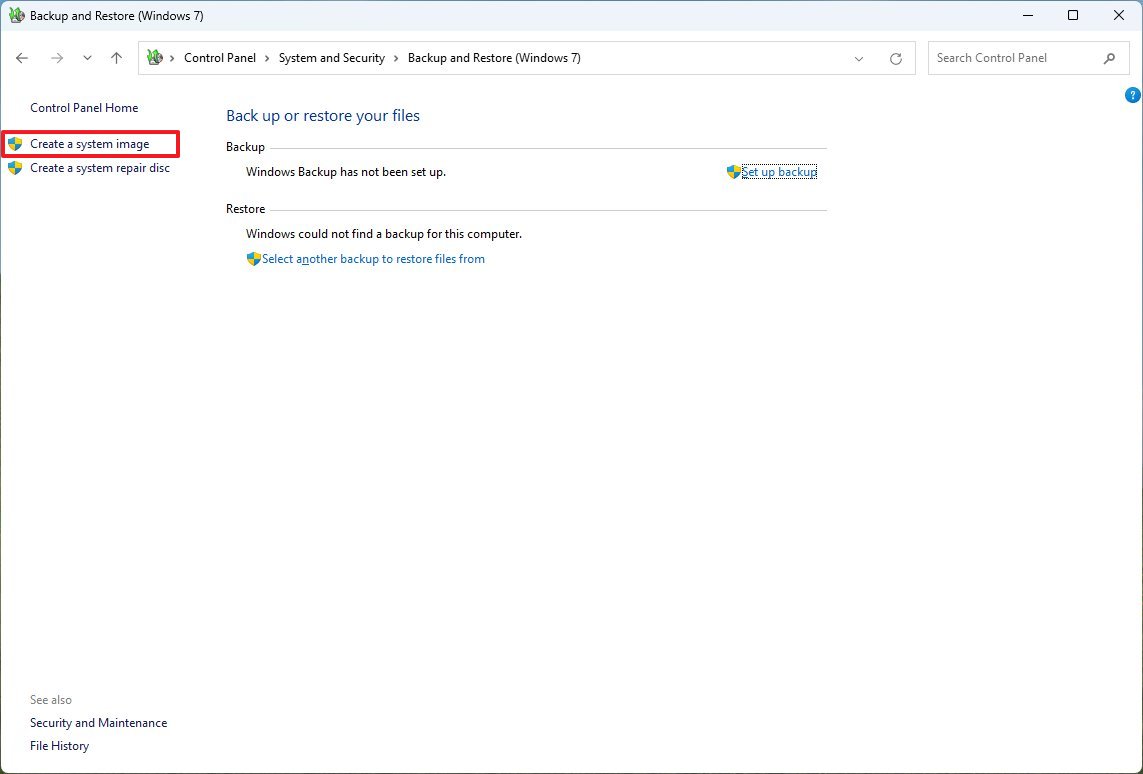
Click the “System Image Backup” option from the bottom-left corner.
(Image credit: Future)
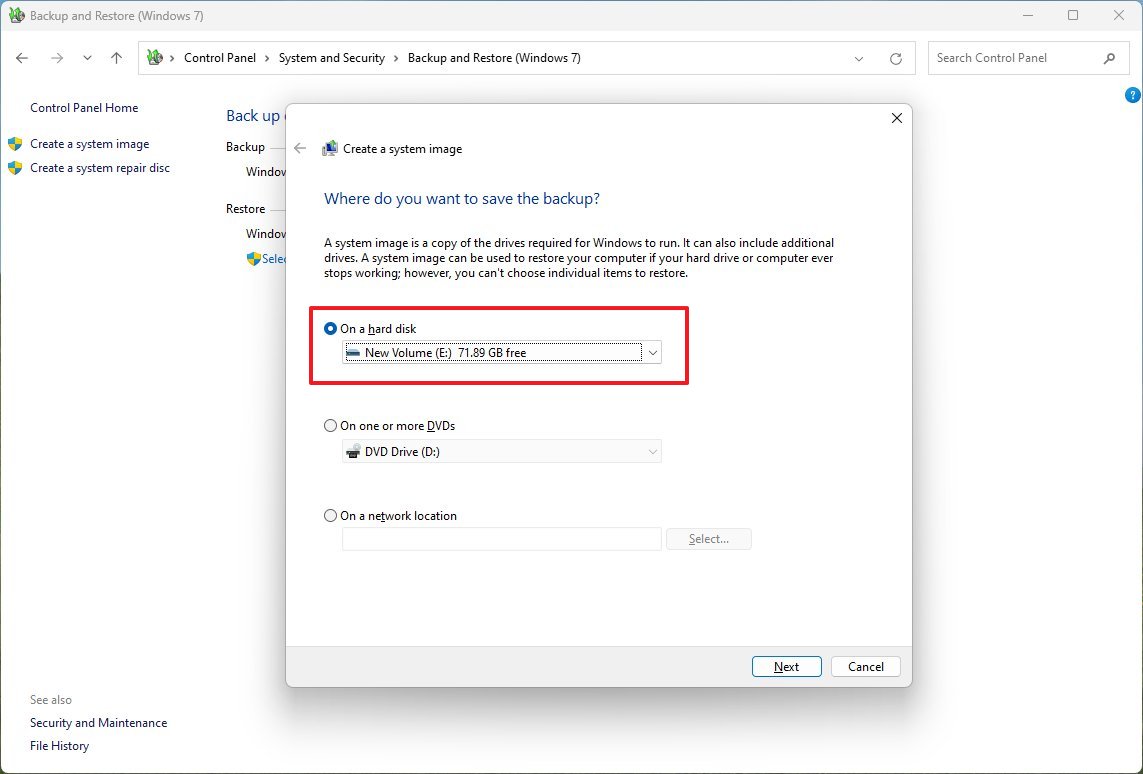
Select the “On a hard disk” option.
Use the “On a hard disk” drop-down menu and select the Windows 11 full backup destination.
(Image credit: Future)
Click the Next button.
(Optional) Select any additional drives to include in the backup.
Click the Next button.
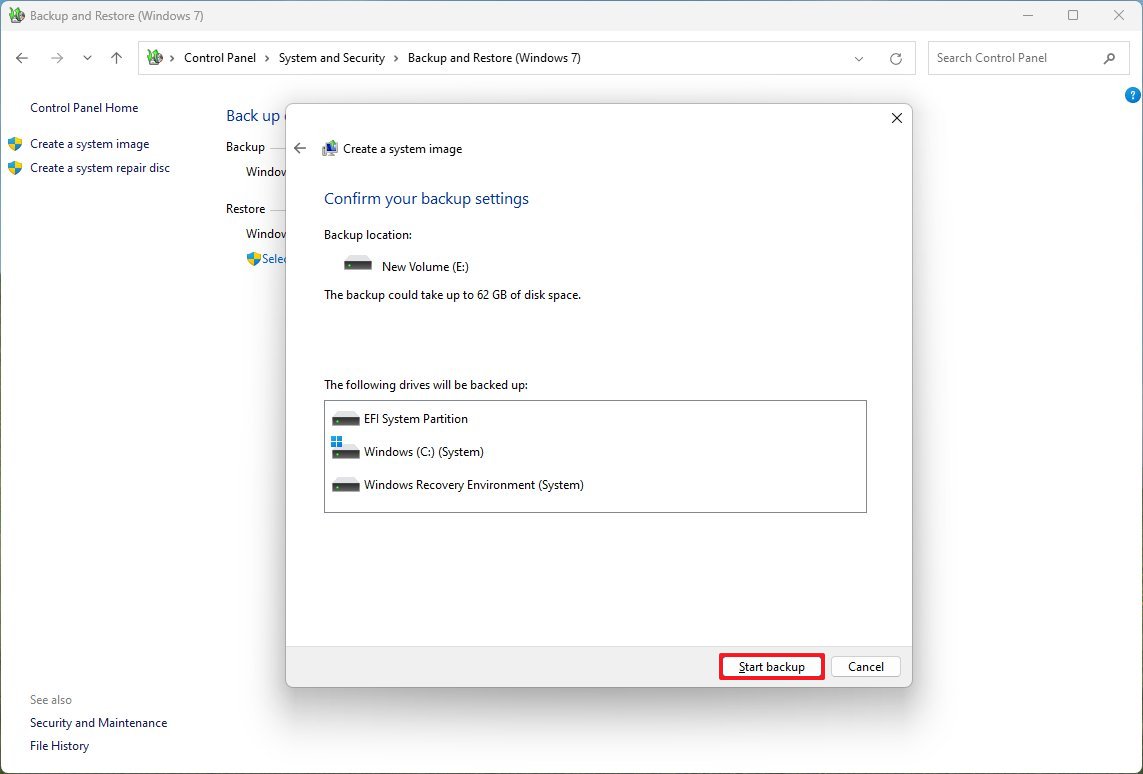
Click the Start backup button.
(Image credit: Future)
Click the No button.
Click the Close button.
After you complete the steps, you will have a way to recover your computer and files in case an update breaks the installation.
If something happens and you have to recover from a previous backup, you can refer to my previous guide on backing up and restoring Windows 11.
In addition to using the System Image tool, you can alternatively use the “Backup and Restore” feature. On Windows 11, this feature allows you to set up daily automatic backups of the operating system and your files.
Once it’s configured, it’ll create an initial full backup and then continue creating incremental backups according to the schedule you have selected.
Furthermore, you should also complement your recovery plan with a file backup, which can be easily done using OneDrive or another cloud service.
Of course, you can always copy your files manually to an external storage, or you may use third-party tools.
Additional tips for updating the system
Although updates are crucial to any operating system or application, unless the specific patch fixes a critical vulnerability, you should consider delaying the update for at least two weeks or until you can verify that the release is safe for your computer.
You can do this by proactively pausing the feature through the Windows Update settings page. If you decided to disable the automatic updates, don’t click the “Check for updates” button until you can confirm the release doesn’t include any known issues.
You can always check the Windows release health dashboard, where it lists known issues and update blocks.
Alternatively, when an update is ready, you can also postpone the restart for several days. If there’s a problem with the update, postponing the reboot can give you some time to back up your data and perform other actions before it’s too late.
More resources
Explore more in-depth how-to guides, troubleshooting advice, and essential tips to get the most out of Windows 11 and 10. Start browsing here:
Call of Duty HQ, which serves as the launcher for the latest entries in the franchise, is known for its abysmally large file size. Regardless of the platform, the launcher can easily hog upwards of 100 GB in disk space even if you only have Warzone installed. To everyone’s surprise, Activision are all set to decrease that figure dramatically via a mysterious update.
Call of Duty’s unified launcher went live back in 2022 with the release of Modern Warfare II. It has since been the centralized hub for the franchise, being the access point for Modern Warfare (2019), Vanguard (2021), and 2024’s Black Ops 6, to name a few. CoD HQ by itself can be a real burden on hard drives, and once you stack on top the hefty sizes of individual games, the total disk consumption can easily amount to 150 GB.
Fans have been demanding a decrease in that figure for ages, with little to no avail. But based on details surrounding an upcoming PS5 update, it looks like Activision have finally learned the art of file compression.
Call of Duty HQ Slashes File Size, Bringing it Closer to Battlefield 6
As revealed by the ‘PlayStation Game Size’ account on X, the 01.080.000 update for the Call of Duty launcher will bring the game’s PS5 file size down to just 25.377 GB. The previous figure sat at 126.224 GB, marking a 100+ GB reduction, which is baffling, to say the least. Its last-gen version will also see a decrease, going from 81 GB to 62 GB on the PS4. How the game will weigh on Xbox machines is unconfirmed as of now, but there should be significant changes on Microsoft’s platform as well.
So what has brought about this change? Well, it’s impossible to say for sure. Just yesterday, widespread outages were reported across nearly every active Call of Duty title, causing plenty of confusion within the community. These issues have now been fixed, but perhaps the games were brought offline to implement this change? This is purely speculative, of course.
Another theory gaining traction online has to do with Battlefield 6. The upcoming title is confirmed to have a file size of around 60 GB, which is drastically better than Call of Duty HQ’s pre-update size. According to fans, this discrepancy is yet another feather in Battlefield’s hat, and could potentially divert players to EA’s shooter. So, in response, Activision have implemented a long overdue size reduction, and made things much more reasonable. Again, this is purely speculative as well.
With all that being said? Are you happy to finally see its file size go down? Be sure to let us know in the comments.
Aryan Singh
A massive gaming nerd who’s been writing stuff on the internet since 2021, Aryan covers single-player games, RPGs, and live-service titles such as Marvel Rivals and Call of Duty: Warzone. When he isn’t clacking away at his keyboard, you’ll find him firing up another playthrough of Fallout: New Vegas.
As August comes to an end, it’s that time again to take a closer look at the new features and changes that Microsoft has made available for Windows 11 during the second half of the month through the various channels of the Windows Insider Program.
Since my last compilation of improvements, the software giant has released at least nine new preview builds in the Canary, Dev, and Beta Channels with changes that are not tied to any specific release of the operating system, and some others for version 25H2 and 24H2.
In the Canary Channel, we’ve seen builds 27928, 27924, and 27934. In the Dev Channel, the company rolled out the preview builds 26200.5761, 26200.5751, and 26220.5770. Finally, in the Beta Channel, we’ve seen 26120.5761, 26120.5751, and 26120.5770.
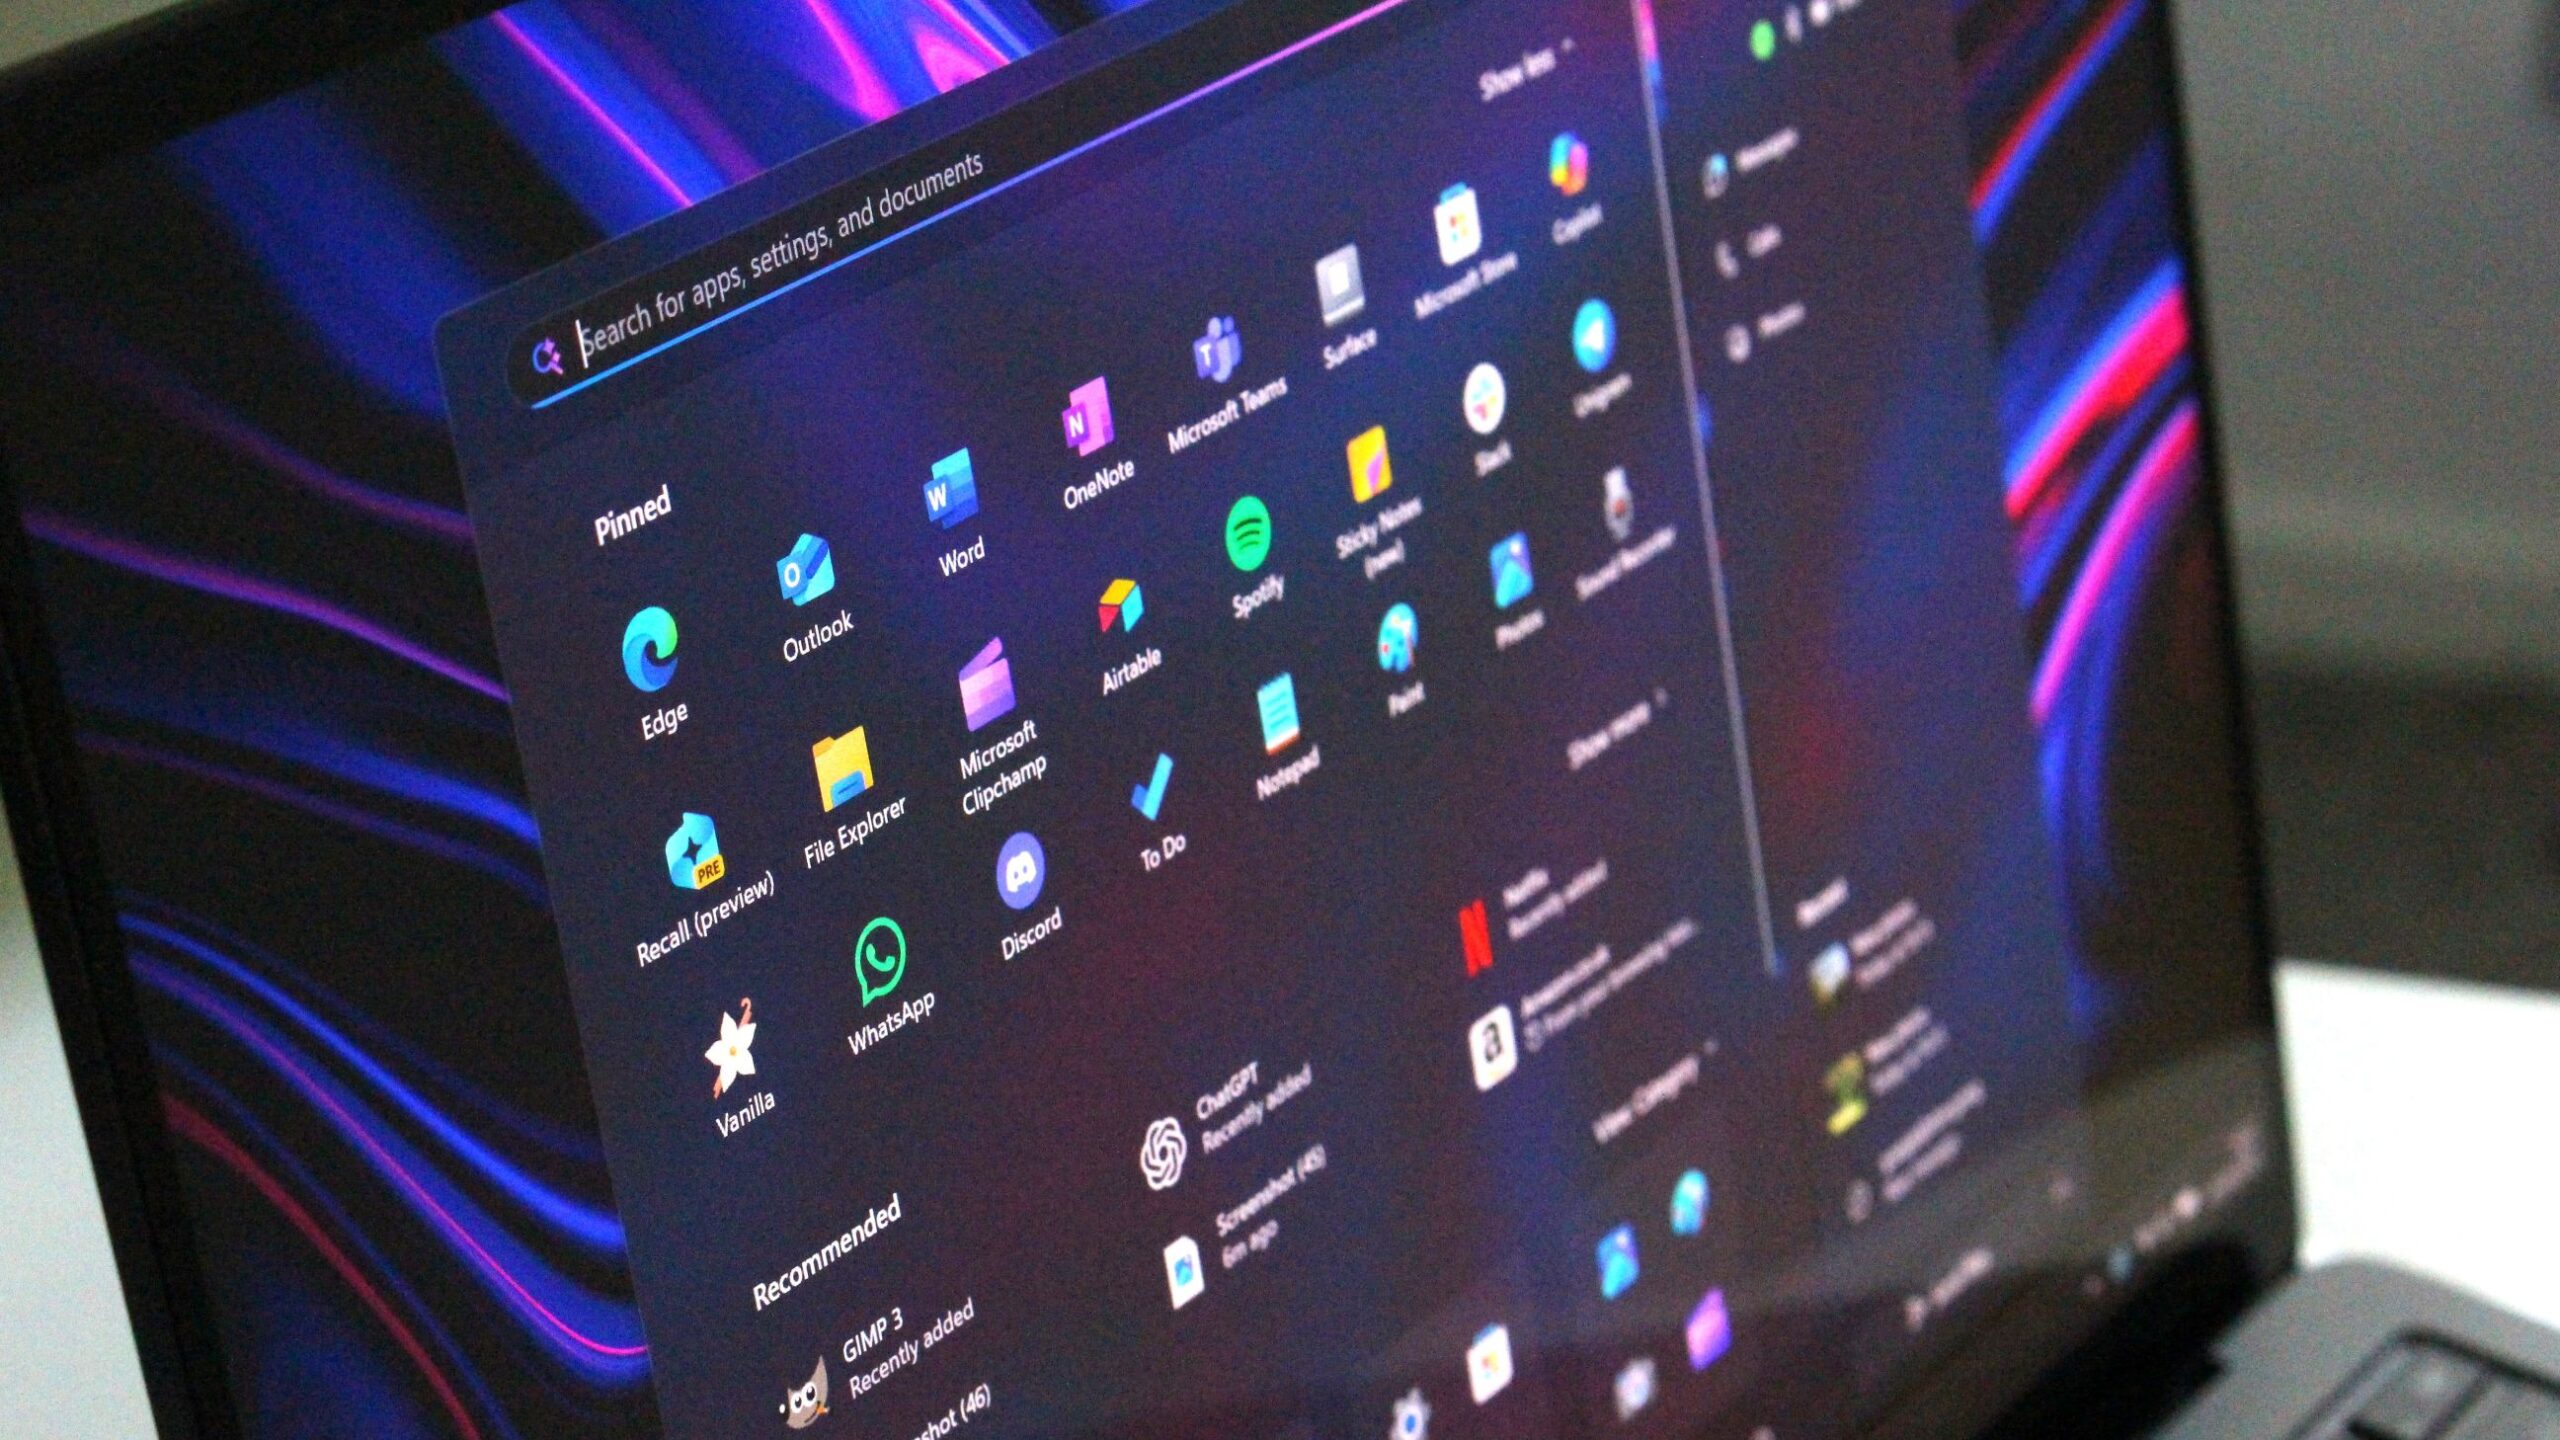
Currently, the previews in the Beta and Dev Channels are virtually identical, featuring new features such as the ability to resume Android apps on your PC, new battery iconography for the Lock Screen, AI actions for File Explorer, and various other visual changes and improvements.
In the Canary Channel, the company has been focusing on introducing some of the changes already available in other channels, such as porting legacy Control Panel features to the Settings app, replacing the “For developers” page with the “Advanced” page, and making other minor adjustments.
Here, I’ll highlight the new visual changes and features that were released during the second half of August 2025.
Biggest changes from the Windows Insider Program in August 2025
Check out the improvements available for Insiders since my last roundup of preview builds. (Image credit: Future)
1. Windows 11 resumes apps from Android
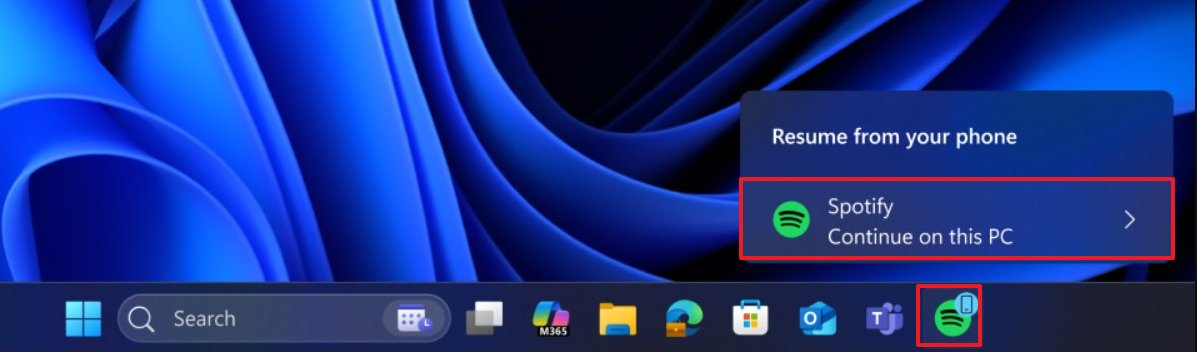
As part of this wave of changes, Windows 11 builds 26200.5761 and 26120.5761 introduce a new feature that allows you to pick up your apps where you left off on your Android phone from the Taskbar.
This feature works in conjunction with the mobile integration, using the “Link to Windows” app for Android and connecting it through the “Manage Devices” feature.
Once you turn on the “Allow this PC to access your mobile devices” option, when using an app on your Android phone, you’ll notice a “Resume alert” notification in the Taskbar that allows you to continue the app on Windows 11.
(Image credit: Microsoft)
If the app isn’t available on your device, the “Resume alert” notification will provide the option to install it from the Microsoft Store.
2. Lock Screen new battery icon
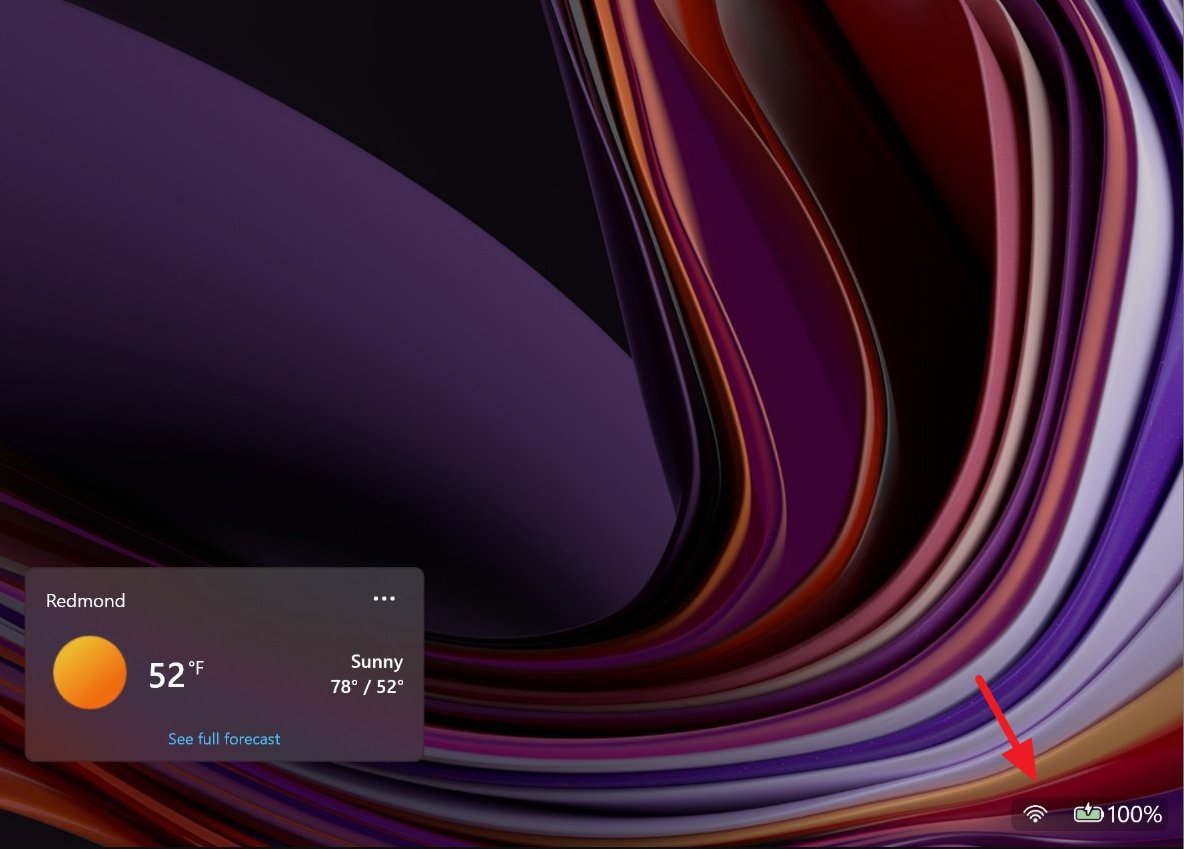
Microsoft is also updating the battery icon that appears in the Lock Screen to align with the new design for the same icon available in the System Tray for the Taskbar.
(Image credit: Microsoft)
When the battery is in good condition and plugged in, it’ll show a green color. Then, it will turn yellow when the energy-saving mode is active, and you’ll see a red icon when the battery is low.
This change is also available starting with the release of builds 26200.5761 and 26120.5761.
3. New keyboard shortcuts
Windows 11 now also includes new keyboard shortcuts to quickly type an En dash (–) or an Em dash (—) without having to open the Emoji Panel.
The shortcuts are as follows:
En dash (–): Windows key + Minus
Em dash (—): Windows key + Shift + Minus
This isn’t a significant addition, but having these shortcuts available is convenient.
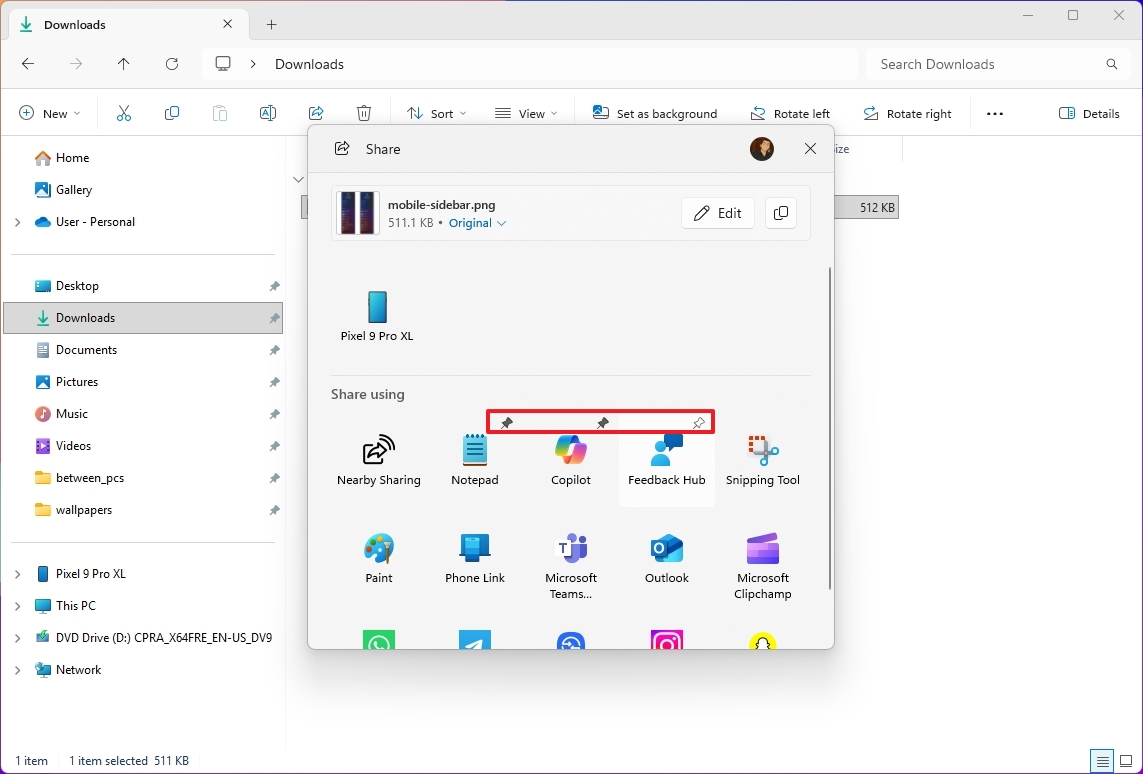
4. Windows Share pin option
Finally, as part of builds 26200.5761 and 26120.5761, the Windows Share interface is getting updated with an option to pin your favorite apps under the “Share using” section.
(Image credit: Mauro Huculak)
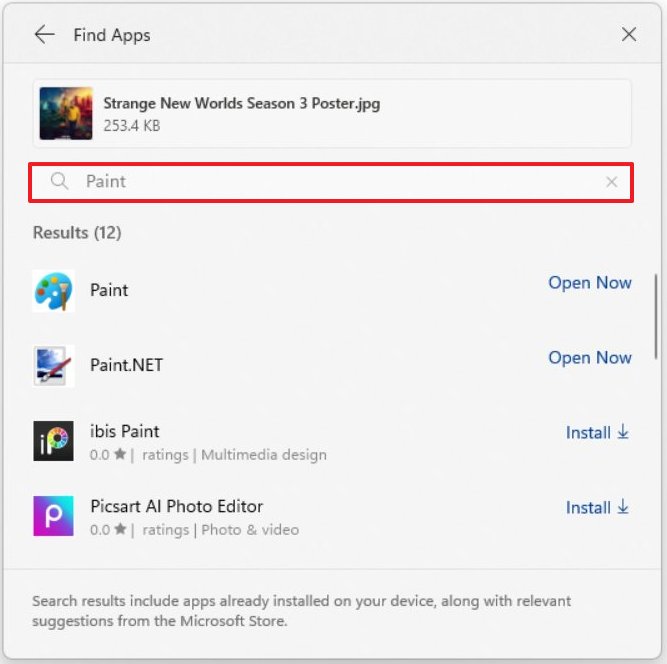
In addition, starting with builds 26220.5770 and 26120.5770, the company is updating the Windows Share interface with a new “Find apps” option that allows you to select the app that you want to share the content with.
(Image credit: Microsoft)
Also, the list will show apps from the Microsoft Store that you can install on your computer.
5. File Explorer updated dark mode
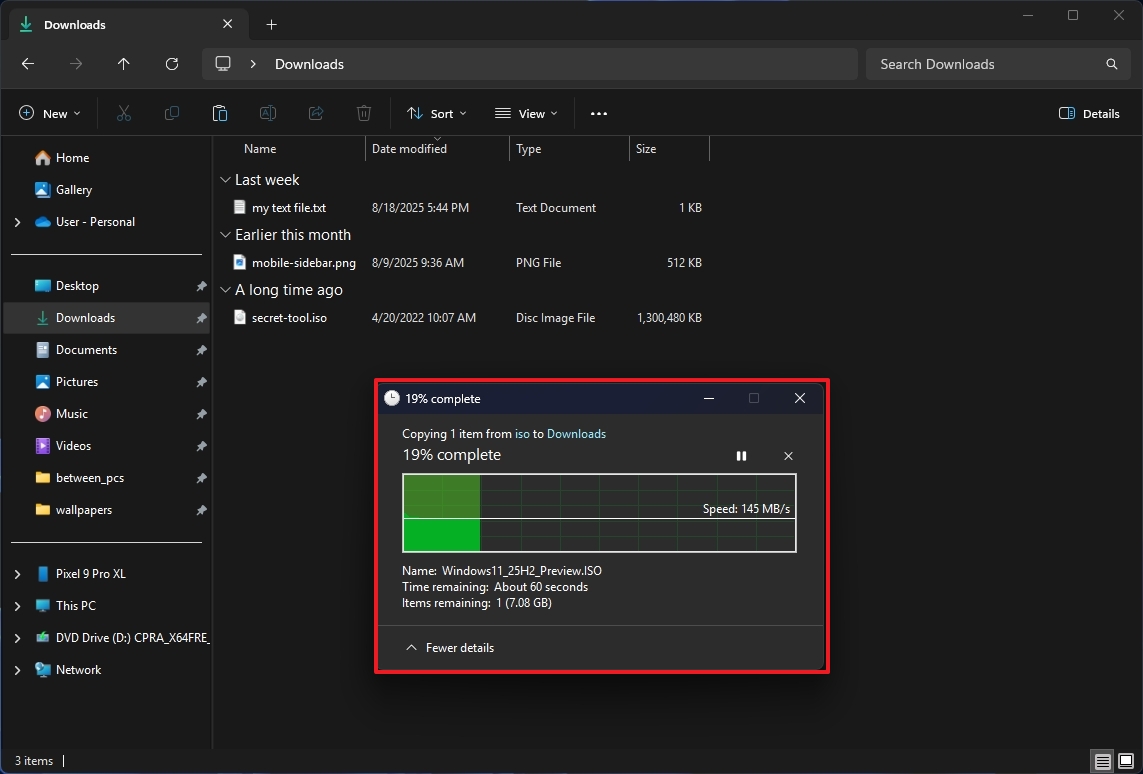
When the company released preview builds 26200.5751 and 26120.5751 for versions 25H2 and 24H2, it also made an updated version of File Explorer available, featuring a couple of improvements, including long-overdue enhancements for the dark mode experience and fixes for the “Open with” context menu.
As part of the dark mode improvements, with these releases, Microsoft brought the dark color scheme for the copying files, confirming permissions, and deleting files and folders dialogs.
(Image credit: Mauro Huculak)
However, File Explorer still has many visual elements that are not compatible with dark mode, including the “Folder Options” page.
(Image credit: Mauro Huculak)
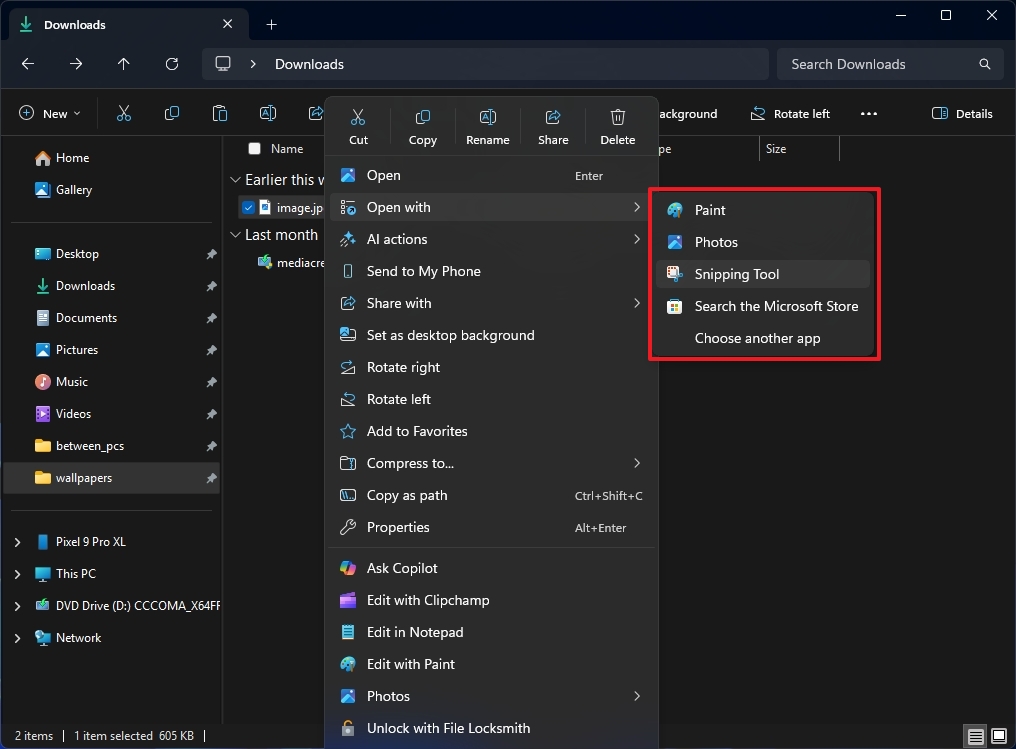
In the “Open with” menu, you’ll notice that the icons have been updated to remove the accent colored backplate, allowing bigger icons that are now easier to read.
6. Click to Do new selection options
Microsoft has also been working on Click to Do for Copilot+ PCs, and it’s now adding new selection options, including “Freeform Selection,” “Rectangle Selection,” and “Ctrl + Click.”
(Image credit: Microsoft)
Freeform Selection: Allows you to use your finger or pen to draw around the items you wish to select.
Rectangle Selection: Creates a rectangle selection.
Ctrl + Click: Hold down the “Ctrl” key and click on each item to select multiple entities.
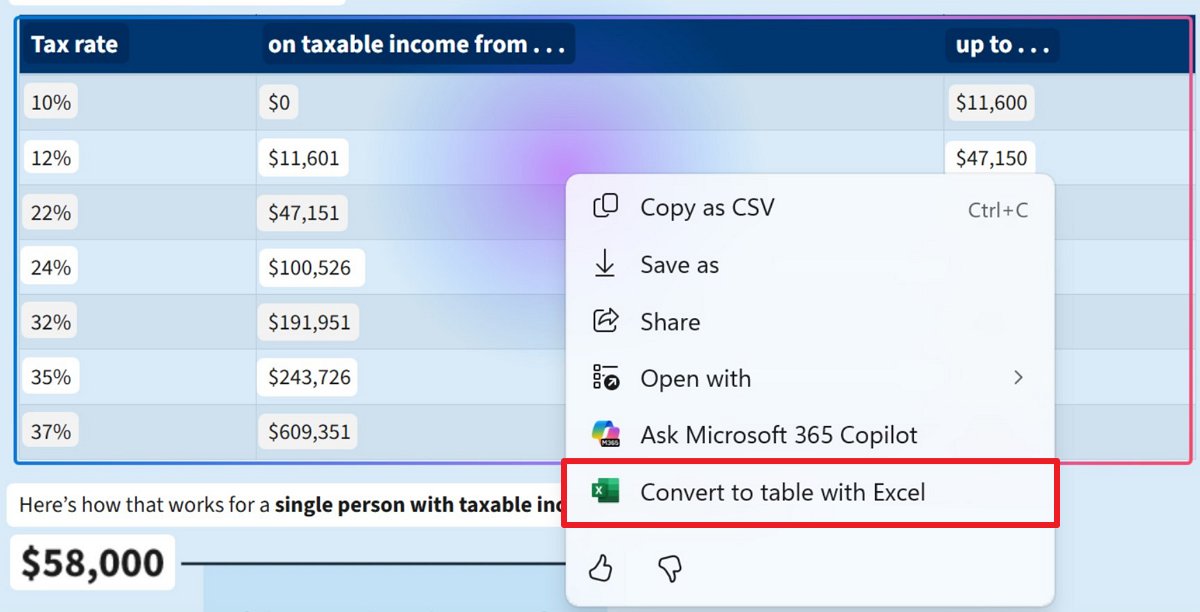
On Click to Do, the feature is getting an update that introduces two new actions, including “Convert to table with Excel” and “View Microsoft 365 Profile Cards.”
The “Convert to table with Excel” action allows you to export a table in your current snapshot directly into an Excel file.
(Image credit: Microsoft)
This feature is available for Copilot+ PCs with a Snapdragon processor and requires the latest version of Excel, which can be accessed with a Microsoft 365 subscription.
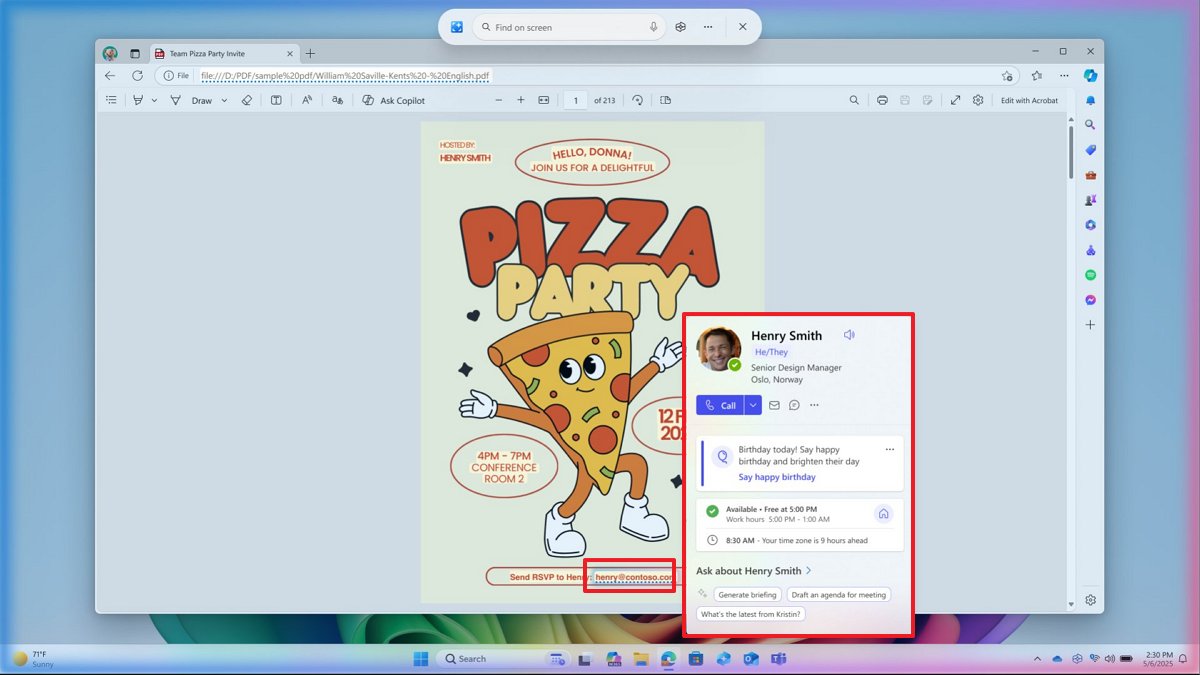
Finally, the “View Microsoft 365 Profile Cards” action displays a card with the person’s contact details from the organization or school when hovering over, for example, an email in a snapshot.
(Image credit: Microsoft)
These actions are available starting builds 26220.5770 and 26120.5770 in the Dev and Beta Channels.
7. Legacy Control Panel features in Settings
We’ve seen these changes in previous builds, but it’s worth pointing out that Microsoft continues the process of catching up with the Canary Channel with the improvements available in the other channels.
Starting with the release of Windows 11 build 27928, the company began porting legacy features from the Control Panel to the Settings app.
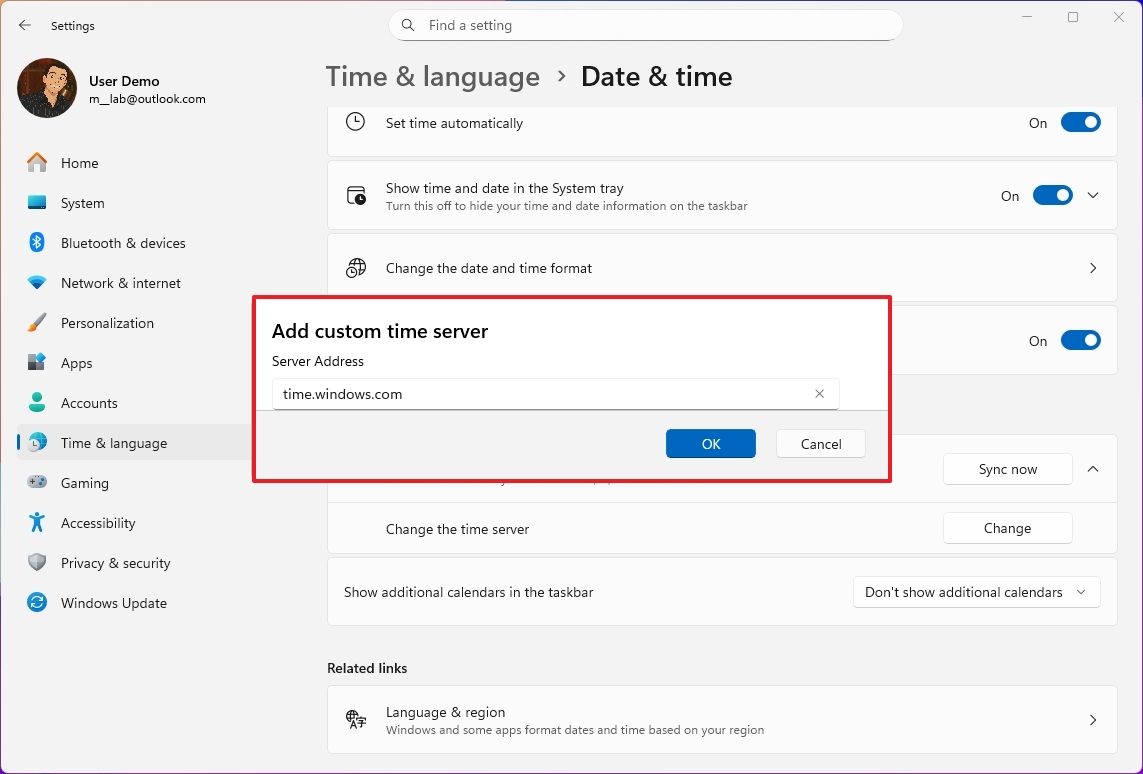
On the “Date & time” page, these changes include the ability to add multiple clocks to the Notification Center, change the time server, and the company is also bringing the “Format” settings to this section.
(Image credit: Mauro Huculak)
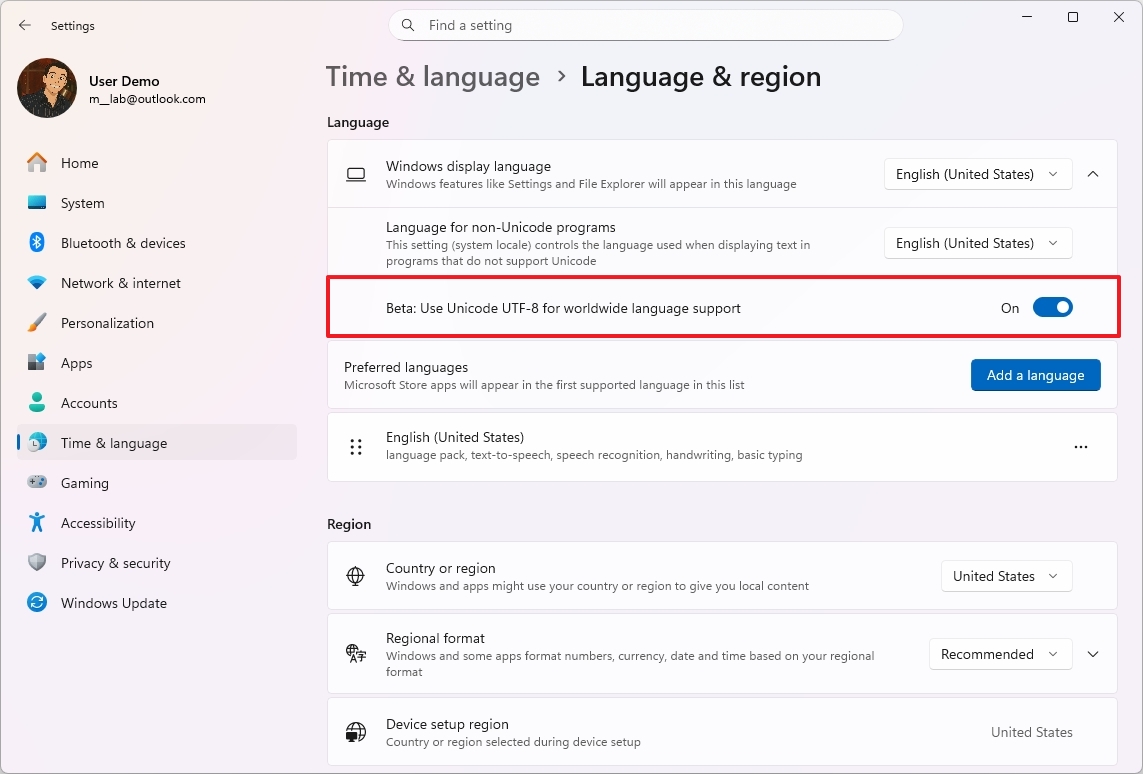
On the “Language & region” page, Microsoft is adding the option to enable “Unicode UTF-8 for worldwide language support,” more regional format settings, and the ability to copy user settings.
(Image credit: Mauro Huculak)
You can learn more about these changes in my previous article, highlighting all these and other changes in the Windows Insider Program.
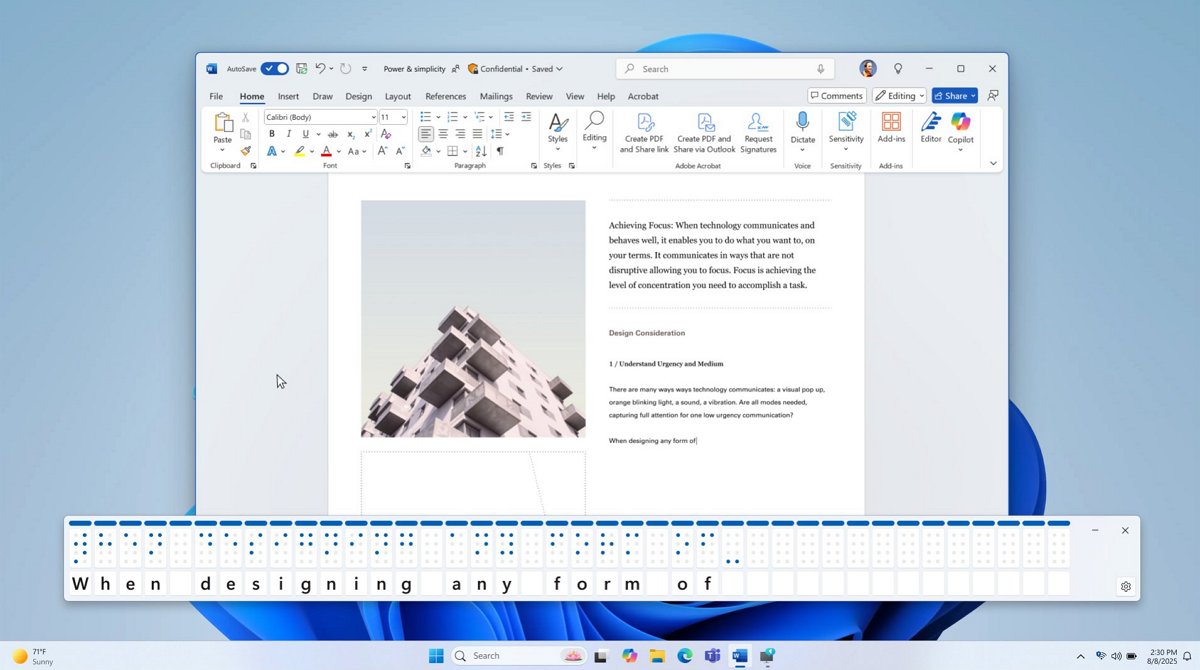
8. Narrator with Braille
In this wave of changes on builds 26220.5770 and 26120.5770, Microsoft is also adding a new Braille viewer in the Windows Narrator.
The new feature will allow you to view the output as it will be shown in a Braille display for teaching purposes.
(Image credit: Microsoft)
This feature requires a special package that can be downloaded from Settings > Accessibility > Narrator > Use a Braille display with Narrator.
Once the package is installed, you can use the “Windows key + Ctrl + Enter” keyboard shortcut to launch the Narrator features, and use the “Narrator key + Alt + B” shortcut to access the Braille feature.
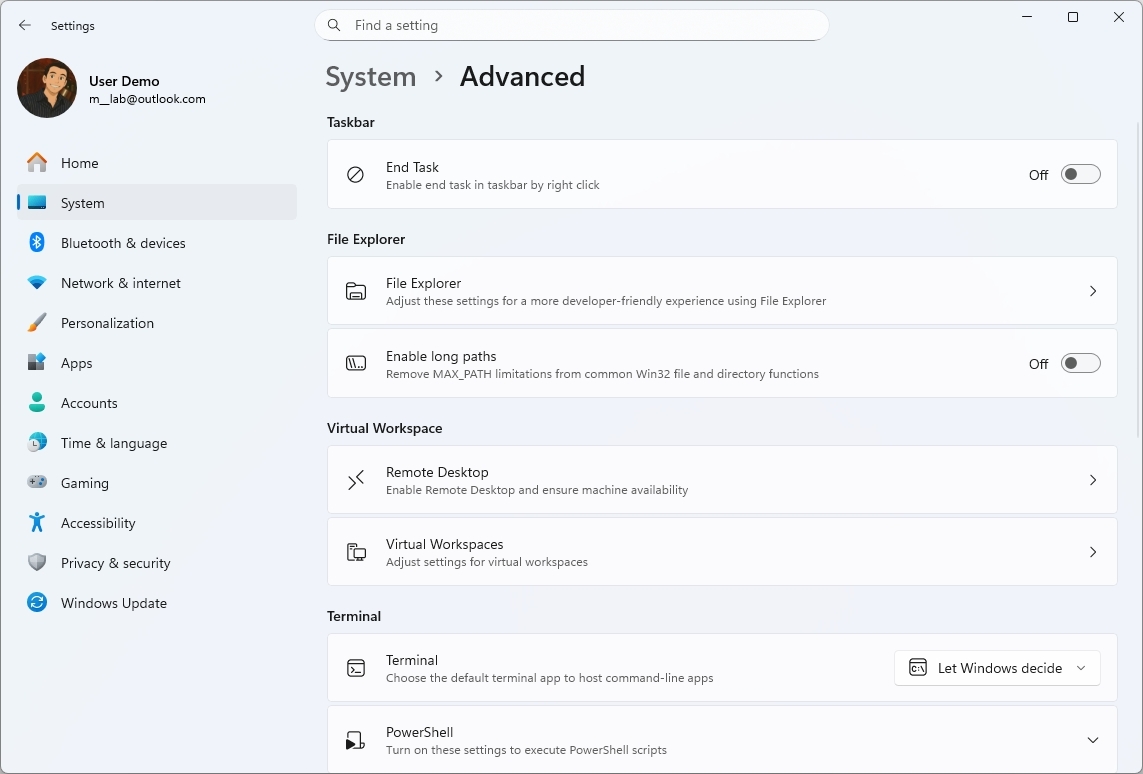
9. Advanced Settings page
As part of build 27924, the development team is replacing the “For developers” page with the “Advanced” page.
(Image credit: Mauro Huculak)
In addition to a new design that matches more closely the operating system design and the previous features available on this page, you’ll find new features, including the ability to enable long paths, virtual workspaces, and Git integration.
It’s worth noting that Microsoft also plans to bring these changes with the release of the September 2025 cumulative update for the operating system.
Additionally, alongside build 27924, the company began rolling out features that you are already familiar with, including Windows Recall, Click to Do, and an AI agent for the Settings app, to the Canary Channel.
More resources
Explore more in-depth how-to guides, troubleshooting advice, and essential tips to get the most out of Windows 11 and 10. Start browsing here:
I recently moved to a new apartment, and unfortunately, the television didn’t make the cut during the amicable roommate split. While my studio isn’t as cramped as my previous living situations, fitting a bulky TV into the living area still felt impractical to me.
In my search for a suitable alternative, a startup called Lumi Labs reached out about testing its new portable projector, the Lumi Max. From the moment I unboxed it, I was impressed by how far projectors have come since my college days, when I struggled with a dingy one passed down from a friend that projected grainy video onto my dorm wall.
One of the things I appreciate about the Lumi Max is its compact design. It stands vertically, making it perfect for small spaces; it can easily rest on a shelf or be tucked away when not in use. Weighing in at just over 4 pounds, it’s noticeably lighter than many other projectors on the market. The founders are avid camping enthusiasts, so it’s designed to fit snugly in backpacks, making it convenient to travel and set up in outdoor settings. Plus, it comes with a carrying case.
The standout feature of the Lumi Max, which became available earlier this month, is its partnership with Google. The projector runs on Google TV by default, providing access to over 10,000 apps, more than 700,000 movies and TV shows, and over 800 free live TV channels out of the box. Setting it up is simple if you already have a Google account, and it includes a remote for easy navigation.
Beyond the built-in Google TV, other features caught my attention, like the autofocus and obstacle avoidance features. The Lumi Max can recognize objects on the wall — such as picture frames, plants, or shelves — and automatically adjust the image placement. Since I haven’t put any art on my walls yet, I had a blank canvas to work with. However, it did alert me when my chair was in the way, allowing me to easily reposition it for the best viewing experience.
The display size is also impressive: 40 to 120 inches, and it’s coupled with 1080p full HD resolution and 4K UHD compatibility.
Another pleasant surprise was the sound quality. The Lumi Max features two 5W speakers (delivering a total audio output of 10W), and there’s also Dolby Audio support, so you can hook it up to an external sound system for enhanced audio performance.
Techcrunch event
San Francisco | October 27-29, 2025
The price tag comes in around $400, which is quite reasonable considering the array of features it provides, especially when compared to what I would normally spend on a decent-quality television.
Lumi Labs also sells adjustable projector stands for $30 and 100-inch projector screens for $20 on its website. The company is also set to launch a “Lumi IQ” mobile app that features an AI assistant, allowing users to control the projector with their voice.
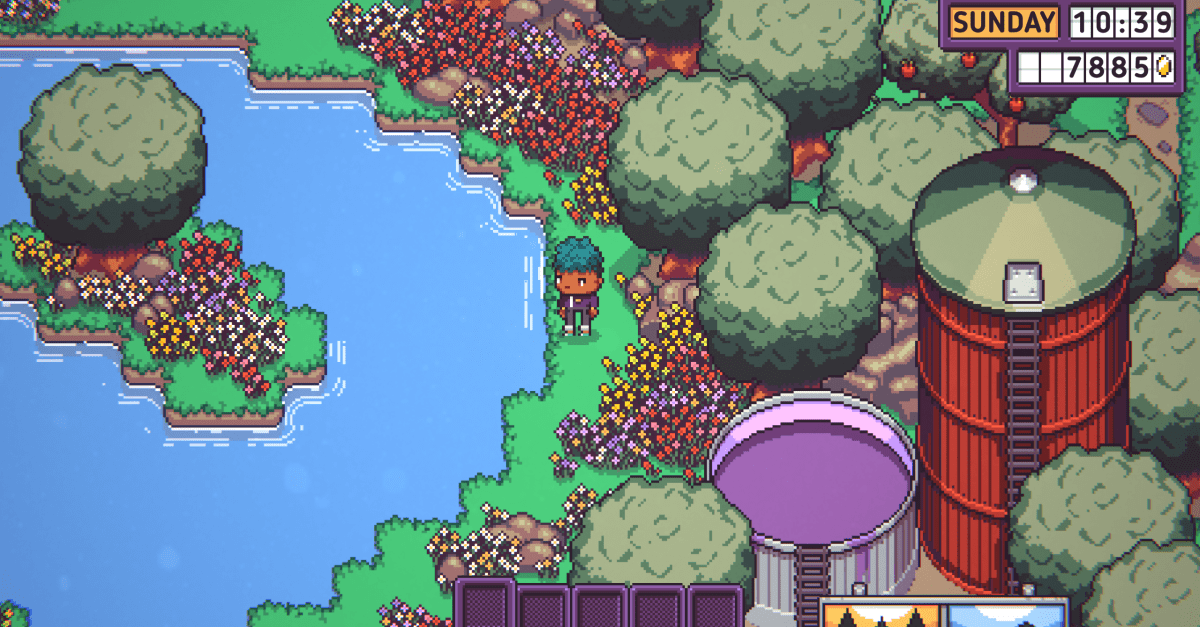
There’s a pleasing rhythm to cozy life sims. The virtual days pass, filled with chores of tending crops or running a business, punctuated by strange mysteries or evolving relationships. At their best, these games merge busywork with exploration and storytelling, in a way that makes them hard to step away from. Discounty, from developer Crinkle Cut Games, applies this idea to running a small-town supermarket. And while in many ways it can still be considered “cozy” like its contemporaries, it also comes with a bit of bite.
Instead of starting up your own business from scratch, Discounty has you taking over a grocery franchise from your cranky aunt in a small town that has seen better days. It’s a strange place; the most famous resident is the inventor of the keyring, and parts of the surrounding woods have been closed off for safety reasons. But it’s still friendly and comforting in the way small towns are, with a handful of residents who you’re really able to get to know over the course of the game. There’s also plenty of drama.
Actually running the store is your main job. From open to close, you are the only employee, so you have to deal with everything from managing the cash register — which involves, gasp, doing math — and keeping the shelves stocked so no one complains there’s no coffee or shampoo. But you also handle all the behind-the-scenes work: ordering new products, organizing the storage area, throwing out the trash, even negotiating with local vendors for fresh fish and produce. This part of the game is satisfying because it requires you to focus on what’s immediately in front of you (a bunch of picky customers) while also planning and strategizing for the future.
As you progress, your shop will expand both in terms of what you can sell and its physical size, which in turn makes the core gameplay loop more complex and challenging. In order to move things forward, though, you’ll have to get involved with the townsfolk. Working with local vendors usually means doing them some kind of favor, whether it’s finding some lost sheep or stocking gross Christmas-themed fish sticks. This can pull you down all kinds of narrative rabbit holes.
What’s most interesting about Discounty’s story is how it explores a number of real-world issues in its otherwise cozy and silly world. For starters, not everyone is happy about a big chain moving into town. When I finally expanded my shop’s footprint, usually a moment to celebrate in these kinds of games, everyone was mad because I did it by taking over an adjacent tea shop. The cafe had been shut down for years, but everyone still viewed it as an important part of the fabric of the community, and I was dismantling that.
Sometimes succeeding in the game isn’t actually good for the town itself. And while these threads often hide their darker edge behind humor — in order to get a construction permit, I had to help a city clerk dispose of environmental impact reports — Discounty is surprisingly sharp with its commentary, even if it never goes especially hard at any of its targets.
That mixture of satisfying gameplay and a story that’s both relatable and genuinely funny is what makes Discounty work so well. It’s not an escape to an idyllic farm or mountain getaway. It’s you doing a job that’s hard and not always pretty, while trying to make the best of things. Most of us know just what that’s like.
Discounty is available now on the Switch, PlayStation, Xbox, and PC.
Fall is just around the corner, which means we’re in the midst of flagship phone season. Most recently, Google debuted its new Pixel lineup, offering multiple models where AI features take center stage. We’ve already put those devices through their paces, in addition to the best noise-canceling earbuds you can buy and a Sony camera. Read on to catch up on the reviews you might’ve missed over the last few weeks.
Google Pixel 10 Pro and Pro XL
Google / Engadget
For those who appreciate convenience and usability over simple raw performance, the Pixel 10 Pro and Pro XL are the smartest choices among today’s Android flagship phones.
Pros
Longer battery life
Brighter displays
100x Pro Res Zoom adds major magnification
Pixelsnap charging (aka Qi2 support)
Magic Cue is super helpful (when it works)
Cons
No more wireless powersharing
Processing full-res images is a bit slow
Pixel 10 line is eSIM only in the US
$999 at Amazon
If you’ve never really felt like your “smartphone” was all that “smart,” senior reviews writer Sam Rutherford argued that Google has finally achieved the feat. Arguably, the best aspects of the Pixel 10 Pro and Pro XL come down to their AI features, especially Google’s Magic Cue. “Now that we can look back at 10 generations of devices, Google’s overarching strategy is more convincing than ever,” he said. “For the Pixel 10 Pro and 10 Pro XL, the company has combined iterative hardware upgrades with a solid (and attractive) design while its software and AI continues to outpace its rivals.”
Google Pixel 10
Billy Steele for Engadget/Samsuing
Google has redrawn the expectations of base flagship smartphones. While it doesn’t have cameras quite as powerful as the Pixel 10 Pro, it combines the utility of a long-range telephoto camera with an array of camera software tools that benefit both professional and novice smartphone photographers alike. Under the hood there’s a tangibly more powerful processor and a bigger battery, while Qi2 support with Pixelsnap means the Pixel 10 works with tripods, wireless charging docks and other accessories made for iPhones.
Pros
Telephoto camera with 5x zoom
Magic Cue is truly helpful (when it works)
Improved performance
Pixelsnap means it works with MagSafe peripherals
Cons
eSIM only in the US
Battery life doesn’t match its predecessor
$799 at Amazon
If the Pixel 10 Pro duo is finally putting the “smart” in “smartphone,” UK bureau chief Mat Smith concluded that the Pixel 10 has redefined base-level flagship phones. A more capable camera, more power and Qi2 support mean you might not be as tempted by those pricer models. “The Pixel 10 is a substantial upgrade from the Pixel 9, although given it has the Tensor G5 chip, it’s a shame that software features like Zoom Enhance from last year’s Pixels didn’t make the cut,” he said. “Unless you’re a die-hard smartphone gamer, there isn’t a more capable smartphone at this price.”
Bose QuietComfort Ultra Earbuds (2nd gen)
Bose/Engadget
The best noise-cancelling earbuds are further improved thanks to enhanced ANC and other upgrades.
Pros
Stronger ANC filters out more distractions
Enhanced call quality
Cons
Battery life isn’t improved
Bulky design is unchanged
$299 at Bose
The second-generation of Bose’s QuietComfort Ultra Earbuds aren’t a complete overhaul, but they didn’t necessarily need to be. The company strengthened its already outstanding active noise cancellation while enhancing call clarity and making several other adjustments. “Simply put, the QC Ultra Earbuds remain the best option for wireless noise-cancelling earbuds, and that’s not likely to change anytime soon,” I said.
Sony RX1R III
Sony
The RX1R III offers stunning visual quality, but other parts of the camera, including the rear screen and viewfinder, leave a lot to be desired.
Pros
Incredible image quality
Fast, accurate autofocus
Small, compact design
Cons
Expensive
No in-camera stablization
Fixed screen
$5,100 at Amazon
Sometimes the wait for a new model can be excruciating. That anticipation turns to disappointment when the long-awaited update doesn’t impress. That’s how senior reporter Igor Bonifacic felt when he finally got his hands on the RX1R III. “It’s missing a handful of features the company really should have included for it to hold its own against other high-end compact cameras,” he said. “I love the RX1R III, but I wish it was easier to recommend.”
If you look through the camera roll on your phone, what kind of photos do you find? I see images of my friends, my pets, the odd receipt for a work expense and snapshots of coffee — hey, I was a barista for 11 years! Not every photo is meant to rival an Ansel Adams masterpiece. (Though I’m sure if he had a smartphone, he’d also take a pic of his parking space to remember where he parked his car.)
If you want to take better photos with your phone, Google has added a new tool to the Pixel 10 cameras that could help boost your skills. Camera Coach is powered by Gemini AI and serves up step-by-step instructions for different techniques: how to improve your framing, select the right lens and even hold the phone. Gemini doesn’t alter any of the images but merely acts as a guide, making you do all the work.
What’s great is that you learn in the process. At a time when AI is everywhere, it’s nice to see Google use Gemini as a teaching tool.
I haven’t seen a feature like Camera Coach on any other phone. To test whether this was another AI gimmick or something I’d use more than once, I took it around the streets of San Francisco. And I came away with a lot of great images that I’d say are keepers.
Enlarge Image
When there’s a man standing with his head inside a bell you don’t need much guidance to get a good photo. Camera Coach helped me improve my framing to get a truly great shot.
Patrick Holland/CNET
Don’t miss any of our unbiased tech content and lab-based reviews. Add CNET as a preferred Google source.
How to use Camera Coach
Camera Coach works on these phones:
Pixel 10
Pixel 10 Pro
Pixel 10 Pro XL
Pixel 10 Pro Fold
In the Camera app, frame your subject and, before you tap the shutter button, press the Camera Coach button at the top right (a camera icon with the plus sign). Next, an overlay pops up as your scene is scanned and analyzed. Gemini offers thematic suggestions specific to your composition. You choose one and then have distinct directions on what to do. Finally, you work your way through each step until you get to take the photo.
These are a series of screenshots that I took showing the Camera Coach’s interface, themes and some of the steps it had me do.
Patrick Holland/CNET
I was at a coffee shop and wanted to take a photo of an iced latte. After tapping the Camera Coach button, I got a “finding some options” message. Next, I could choose among several themes like “Iced Coffee Up Close” and “Coffee Drink and Table.” There was even a Rescan button in case I didn’t like the choices. I tapped Get Inspired, which offered artistic themes like “wooden table texture with drink” and “wide view of coffee shop interior.”
After opting for the wooden table and drink theme, I got a message that Gemini was “preparing how-to steps.”
I did my best to follow each step. The first one asked me to switch to Portrait mode. A blue oval around the Portrait button showed me where to tap. Once I did, I pressed the arrow to see the next step. A few steps later, I was finally greeted with a “Take the photo” command. Once I was done, I tapped the X button to close Camera Coach.
The interface after taking a photo is a little convoluted. The preview of the photo you just took is on top of the viewfinder. To exit Camera Coach, there’s an X where the thumbnail for the last photo you took usually is. Since the process for using Camera Coach is considerably slow, this isn’t meant for photographing fast-moving subjects like sports.
Other than that, it’s incredibly intuitive to use. I like how each step explains the “why” behind it. If it asked me to zoom in, it also explained how it would make my subject more prominent in my photo.
If you don’t like the themes Gemini suggests, you can always rescan your viewfinder. The Get Inspired option offers more artistic approaches, like this tight close-up image I took of someone wearing sunglasses with a sculpture reflected in the lenses.
I used Camera Coach’s Get Inspired option and was guided step-by-step on how to get this very cool and dramatic up close shot of a pair of Ray-Bans reflecting a nearby sculpture in the lenses. I also had a very patient subject.
Patrick Holland/CNET
Camera Coach results
I’m pleased with most of the photos I took under Camera Coach’s guidance. Some are slightly different approaches than I’d normally take, and others are perspectives that were new to me. In terms of identifying subjects and the scene in my viewfinder, Gemini did a decent job. Though once in a while, it would interpret things completely wrong, like when it said a basket of ginger root was a basket of peaches.
Sometimes the steps you go through to take a photo seem at odds. When I was taking a photo of a white building with palm trees, it wanted me to reframe the photo so that a parked car wasn’t in the foreground. But then the next step had me zooming out to show more of the white building, which put the car back into the shot. It felt like I was trying to make a lasagna, and the directions I was following were from two different recipes. Fortunately, this only happened some of the time.
Enlarge Image
This image was the result of choosing Get Inspired. It had me zoom in at 40x on the Mission High School dome which got enhanced by the Pixel 10 Pro’s Pro Res Zoom.
Patrick Holland/CNET
Enlarge Image
Camera Coach had me get close to this bougainvillea plant and focus on one of the blooms (just right of center).
Patrick Holland/CNET
Enlarge Image
In this shot, Camera Coach had me move closer to my subject, use Portrait mode (which did an amazing job with her curls) and frame some of the sculpture she was standing in front of into the shot.
Patrick Holland/CNET
Enlarge Image
This is one of my favorite captures with Camera Coach. It took a lot of effort to follow the directions, which wanted me to frame out a car on the right side (you can still see the bumper inching into the frame).
Patrick Holland/CNET
Enlarge Image
Is it art if there’s not at least one image of a bowl of fruit? Camera Coach helped me find a great angle that removed much of the other distractions of the display case.
Patrick Holland/CNET
Enlarge Image
Camera Coach can’t improve the subject. This lovely old pickup was in shadow and despite the feature’s best efforts to help me frame it, I couldn’t overcome the fact that the pickup was backlit.
Patrick Holland/CNET
Enlarge Image
Camera Coach expertly helped me hit the “thirds” in this image of the San Francisco skyline. The tops of buildings cross the top third of the image, and the palm trees cross the bottom third.
Patrick Holland/CNET
Enlarge Image
This was another Get Inspired image. I’m tempted to take it another step and turn it into a black-and-white photo.
Patrick Holland/CNET
Things to know about Camera Coach
After using the Pixel 10 Pro’s Camera Coach for 10 days, I learned that it has some strong preferences and dislikes.
Camera Coach hates shadows
If you have a strong shadow in your image, it will suggest that you reframe the photo to remove it. This is great for those moments where your own shadow might enter your frame on a sunny day, but it did feel aggressive on occasion. For example, in the photo below of a service truck, Camera Coach wanted me to compose my shot so that the truck’s shadow didn’t appear. But the only way to do so would have been to stand in traffic on the other side of the vehicle. No dice.
Enlarge Image
Camera Coach didn’t like the truck’s shadow in this shot. And looking at it now, I agree.
Patrick Holland/CNET
Camera Coach doesn’t like parked cars
I live in San Francisco, and there are many cars parked on the street. More often than not, I was told to “remove the car” that was in the frame. I get it, Camera Coach wants you to block out as many distractions as possible. And most of the time, I was able to move a few feet and re-angle the phone so the car was out of the frame. But sometimes, there’s not enough sidewalk space to get into a position and change the composition.
Camera Coach wants to minimize distractions in your images, especially parked cars.
Patrick Holland/CNET
Camera Coach isn’t fast
You should not use this to grab a photo of your kids or pets unless they’re sleeping. Camera Coach takes a couple of seconds, sometimes longer, to scan your composition and offer recommendations. Part of this seems affected by how strong your internet connection is.
After you choose the style you want from the recommendations, it can take another 5-10 seconds to complete the steps. Sometimes, it’d take me close to a minute before I got the “Take the photo” prompt. So Camera Coach isn’t designed for those times when you want to grab a quick shot with a dog hanging out the window of a passing car.
But that slowness can be nice. It allowed me to pay attention to composition and really contemplate how I wanted to take a photo.
Enlarge Image
Camera Coach isn’t going to be useful in many situations. I had to document this adorable dog with his paw hanging out a car window. I would have missed the shot had I used Camera Coach.
Patrick Holland/CNET
Camera Coach doesn’t have access to all cameras or modes
It’s neat to see that Camera Coach can be used on all of the rear cameras and even with Pro Res Zoom on the Pixel 10 Pro/10 Pro XL. But it doesn’t work with the selfie camera.
I like that it recommends changing modes, and a handful of times it had me switch to Portrait mode, for example. But it can’t access all of them. When I was taking a shot of San Francisco’s skyline, it walked me through the steps of taking a panorama photo, but it wouldn’t let me use Panorama mode. What’s the difference? Before phones and software like Photoshop, a panorama was an image that had a wide field of view and aspect ratio. Panorama mode on the Pixel can create gorgeous panoramic images by “stitching” together a series of images and blending them together.
When the Camera Coach wanted me to take a panorama photo, I naturally went to select that mode but was unable to. My guess is that the two interactive interfaces don’t play well together. Disregarding Camera Coach, I grabbed this photo with the phone’s Panorama mode and was elated with the results.
Enlarge Image
I couldn’t take this photo with Camera Coach. Also I had to shrink the image quite a bit to embed it in this story.
Patrick Holland/CNET
Pixel 10 Camera Coach final thoughts
Google has done an incredible job making Camera Coach an easy-to-use tool. The primary audience isn’t professional photographers or hobbyists but folks who enjoy taking photos and want to learn more about technique. I can see amateurs becoming photography enthusiasts after using Camera Coach for some time.
As someone who got my first camera at age 6 and worked as a professional photographer in my adult years, I found Camera Coach to be a nice reminder of the basics. It forced me to be more thoughtful and deliberate about the images I take.
I won’t become the next Ansel Adams with Camera Coach, but it made me appreciate his work and the techniques he used to create beautiful images before the age of AI — and always with film, large-format cameras and plenty of lenses and tripods.
The Pixel 10 Pro XL Goes to Paris: Out of Hundreds of Photos, These Are My Favs
Courtney John’s design ‘Past, Present, and Future’ represents unity
A plush toy designed in south-west Wales could be sent to space to help astronauts establish the presence of gravity on the Moon’s surface.
Courtney John, 27, from Llanelli, is a finalist in a Nasa global design competition that will see mascots join the Artemis II Moon mission to act as a zero gravity indicator (ZGI).
“I’ve always been interested in space, and the opportunity to have something you’ve made go into space would be amazing,” Courtney said.
She is one of 25 finalists for her design, “Past, Present, and Future”, which consists of three plush humanoids holding hands in a circle.
ZGIs are small items carried onboard spacecraft that show when it has reached the weightlessness of gravity – plush toys are effective ZGIs because they are soft and lightweight.
Courtney, a graphic designer, said she wanted to create a design that represented the “past, present and future” of space travel, while also celebrating unity.
One figure on her design, representing the past, is wearing the spacesuit from the Apollo 17 mission – the last time humans set foot on the Moon on 19 December 1972 – while another is wearing the Artemis II spacesuit, representing the present.
The future is represented by a figure that has a globe for a head, and on its body are messages written by the Artemis II crew.
“It’ll be such a great achievement [for them to go into space], and when they’re in space they’ll be able to see how far they’ve gone,” Courtney said.
Courtney said she has “always been interested in space” and the thought of something she has designed heading to the Moon would be “the biggest achievement in my life”.
“But even being chosen as a finalist is amazing,” she said.
Getty Images
Humans last set foot on the Moon more than 50 years ago
There were more than 2,600 entries for the competition, which called for submissions representing “humanity, exploration and the spirit of the Artemis campaign”.
The winner is expected to be announced later this year.
Artemis, Nasa’s first Moon mission in more than 50 years, is a three-part series of undertakings aimed at putting people on the moon.
The Artemis I mission had no astronauts, but was designed to fully test the Moon mission kit. It was successfully sent in orbit around the Moon in November 2022.
Artemis II, travelling with a crew onboard, will circle the Moon before returning to Earth, while Artemis III plans to land Nasa astronauts on the Moon’s surface.
The original plan was to have people walking on the Moon by the end of 2025, but the mission has been delayed several times.
American astronauts Christina Koch, Victor Glover and Reid Wiseman and Canadian Jeremy Hansen have been selected for the Artemis II mission.